Friday

1-2-3 French Dip Sandwich


If you've been following my blog you probably know that I usually try to cook and bake from scratch whenever possible. I just prefer the taste of honest, well prepared food.


There ARE days, however, when time is short, or there is a special request for a particular meal when cooking from scratch just isn't an option.

This is one of those meals that can be put together very quickly using grocery store-ready ingredients.

French rolls, very thinly sliced deli-roast beef, instant au jus mix, a little garlic, and some good horseradish and sour cream is all you need to make 1-2-3 French Dip Sandwiches.


(You can also add cheese, or grilled onions but I don't care for those on my French Dip.)

First I blend and allow the au jus mix to simmer with a splash of wine and a teaspoon of butter over low heat while I prepare the buns and assemble the sandwiches.


For the horseradish sauce I mix horseradish with an equal amount of sour cream (a little more horseradish than sour cream if you like a stronger flavor.)


I like toasted buns, so I brush each half with a little olive oil or butter which has been infused with minced garlic. Bake or broil until lightly toasted.


You can heat the roast beef, but I don't bother. The warm bun and piping hot au jus brings it to the perfect temperature.


Such an easy sandwich for lunch or dinner, it's next best to roasting your own beef when you crave a French Dip Sandwich.


Wednesday

Leek Quiche in Puff Pastry


It is such an easy quiche to make, using frozen puff pastry. Sauteed sliced onions can be substituted for the leeks or you can use your choice of meat or vegetable filling.

I really like the way leeks and onions take on a subtle sweetness when they are sauteed then baked.

Choose any cheese(s) you prefer. I happened to have Asiago and Gruyère on hand. Swiss, Jack, Cheddar, Brie; any combination would be suitable.


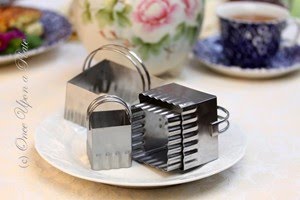
One of the things that helps this type of quiche go together so quickly is frozen Puff Pasty and these French square tart/quiche pans with removable bottoms.

One Pepperidge Farm frozen puff pastry sheet, rolled out just slightly fits perfectly in each pan.


I use the square pans for sweet tarts (fruits and custards) as well. It's so easy to cut neat, even portions from the square shape.


To read more about the square tart pan

see Side Bar ---->

Or click link below:

Gobel 9-Inch Square Quiche Pan


If you have a scrap of dough you might want to cut a decoration and bake it off as a garnish~


I don't use an exact recipe; just sprinkle your cooked vegetable over the dough in the pan, sprinkle with cheese, then pour the whisked eggs (add some fresh minced herbs to the egg/cream mix if you like) to about 1/8 to 1/4 from the rim of the pan. Place on baking sheet and bake.

Here's the general guideline for 1 square 9-inch tart pan:

Preheat oven to 400 degrees (F)

For one square quiche I used one very large, well washed, trimmed leek (the darkest green part tends to be tough so I trim that part off and discard, or use for stock). Slice or chop the leek, saute in a large skillet in a little oil (or 1/2 oil and 1/2 butter) over medium high heat for about 5 minutes or so, until just tender, then set aside to cool slightly.

Roll the thawed puff pastry out gently until it is about an inch larger on each side.

Press into the tart pan, firmly press the pastry to the sides of the pan. Dock the bottom (prick with a fork) at 1/2 to 1-inch intervals all over.

Then a trick I learned from a French chef: Brush the dough with a thin layer of Dijon mustard.

Distribute the cooked leek evenly over the dough in the pan, add a layer of shredded cheese over the leek.

In a bowl whisk 2 or 3 eggs with one cup of half & half, or a mixture of half & half and heavy cream. Pour over the cheese and leeks (you may add a little more cream if necessary to just cover the leek and cheese.) Leave about 1/4-inch to 1/8th-inch space as the filling will puff as it bakes.

Sprinkle a little additional cheese over the top and bake:

Place tart pan on a rimmed baking sheet, in the middle of hot oven and bake for about 35 minutes. Begin checking at 20 minutes , if it is browning too quickly loosely tent with aluminum foil.

I allow mine to bake until the top begins to develop golden brown patches on the top, which I find very appealing ~ the extra baking time also assures the bottom crust won't be soggy.


Cool at least 5 to 10 minutes before cutting to allow the custard to set, then remove the tart pan from the base. Cut into serving pieces. Serve warm or at room temperature.


This time I lightly steamed some fresh asparagus, then drizzled with white truffle oil vinaigrette.

Usually I serve it with some lightly dressed lettuce greens; baby spring greens are a nice accompaniment to a rich quiche.





Tuesday

Orange Macadamia Salad with Crispy 'Butterflies'


Sometimes I go overboard and post too many photos for a particular recipe. Please bear with me, this is one of those posts!

I can't help it. I love everything about this salad, it's a combination of a couple of other recipes. I wasn't quite satisfied with any of them, so I played around and bumped up the flavors with a few additions until I was happy with the results.


As I've mentioned in previous posts, I prefer either simple straight forward salads, or composed salads with more elements which add flavor and textural interest, then arranged in a not-too-fussy way on the plate.

You could add some grilled or poached sliced chicken if you like. The little crispy "butterflies" are optional, I happened to have a few wonton wrappers leftover so used them here. Quickly shaped and fried, they add a whimsical garnish and a crispy crunch.


You can just peel and slice the orange(s), but I like to cut the sections into supremes*, eliminating all pith & membrane from the sections.

I use bagged, organic baby field or spring mix for the greens in this salad. Baby spinach leave would work very well, too.

Be sure to toast the macadamia nuts to bring out the flavor. Toasted almonds (sliced or slivered), hazelnuts, or pecans would also be very good.


Besides the wonton wrapper "Butterflies", as a final garnish I slivered some candied ginger and sprinkled it over the orange segments.

Here are the ingredients for the vinaigrette (and basic proportions.) I rarely measure when I'm cooking, only when I'm baking, so taste as you go along. You may like it sweeter or more tart than I do. :)

Orange Vinaigrette

Orange zest
Orange juice
Unseasoned Rice Vinegar
Pure Maple Syrup
A little granulated sugar or Splenda (if you want more sweetness)
A splash of oil (canola or very mild olive oil)
Salt and Pepper (optional)


Before cutting the orange, use a microplane to collect some of the zest and set aside.
After cutting th orange into supremes, squeeze the remaining membrane into a medium bowl, collecting the juice. (You can add a little more fresh orange juice if you like.)

For a salad for two I used one large, sweet orange.

The juice from the membrane of the orange, (after cutting into supremes)
1 to 2 tablespoons Rice Wine Vinegar (unseasoned)
1/2 to 1 teaspoon finely grated orange zest
1 tablespoon pure maple syrup
I added a teaspoon of Splenda
a pinch of kosher salt
Canola oil ~ about 2 1/2 teaspoons

Whisk all together in a bowl, taste. Adjust ingredients to your preference, drizzle over the composed salads just before serving.


I don't eat a lot of fried foods, and rarely when I dine out.
I'd rather prepare it at home where I can control the quality and freshness of the oil. Although I have a couple of large electric fryers I leave them on the shelf and reach for the much smaller "Fry Daddy". It heats the oil in a matter of minutes and requires only a couple of cups of oil rather than quarts, as larger fryers or pots do. It's ideal for adding a little interesting garnish to a dish, like these wonton butterflies. Depending upon what is cooked in the oil I usually can use it several times before discarding as long as it is kept refrigerated between uses. (I use a separate batch of oil for seafood.)


To make the "butterflies" simply streak a line of water down the center of each wonton wrapper with your fingertip then gather/pinch the center into accordian folds. Pinch the middle to make the shape hold it's shape then fry in hot oil until golden brown on each side. Drain well.


It's one of my favorite salads, especially in the middle of winter!


A little sunshine on your plate. :)


If you try it, I hope you like it, too.


Monday

Postcard ~ From the Kitchen


Taking time for some fresh vitamin 'C' and a sip of something warm on a winter's day.


Sunday

3 Cheese - Vegetable Loaded Quesadillas


A couple of times a week I like to go meatless; this is a vegetarian meal (or snack) that is one of my favorites. It's filling and flavorful with nice textures; crispy, slightly crunchy and creamy all in the same bite.


I used Asiago for the crispy coating on the tortillas (any hard grating cheese such as Parmesano Reggiano, or Romano works well, too.) For the filling I chose a combination of shredded Sharp Cheddar and Monterey Jack this time.

You can use leftover vegetables, but I always use fresh when I make this recipe and cook them until just crisp tender.

Last night I chopped the broccoli and nuked it with a tiny bit of water until just tender. While that was cooking I sauteed some thinly sliced yellow onion in a very little bit of olive oil until caramelized and sweet, then added thin strips of red bell pepper and cooked them until just crisp tender. I removed them to a big bowl, wiped out the pan and proceeded to cook the remaining ingredients in the same pan; sliced mushrooms, crushed garlic, then shredded carrots. I placed those in the bowl too, then season and toss it all to distribute the seasonings.


You can season with any herbs you like; salt and pepper, and I also add a few generous dashes of Chipolte Tabasco for a little added kick. A few drops of red wine vinegar bring a little sparkle to the veggies, too.

I used large flour tortillas this time; for extra crispness and flavor I lightly brush one side of the tortilla with olive oil then sprinkle generously with finely shredded Asiago cheese (press the cheese gently so it adheres), place cheese side down onto a large preheated non-stick surface (skillet or griddle). You want to cook rather slowly over a medium-low heat so the Asiago doesn't burn. Immediately springle a generous layer of your favorite shredded cheese on the surface of the tortilla, layer the veggies over the top of the cheese, then another layer of shredded cheese. Finally another tortilla, when it's in place brush the top lightly with oil and sprinkle generously with more Asiago.

(You can skip the coating of Asiago or Parmesan on the outside, but it adds a delicately crispy, flavorful crunch which is very appealing and moves this quesadilla up a notch.)

Allow the quesadilla to cook until it's nicely golden brown on the bottom, then carefully flip and cook until golden brown and interior cheese is melted and gooey. Slide out onto a cutting board and allow to sit for five minutes or so (it will remain hot for quite some time, but the rest-time allows for neater cutting.) Cut into wedges and serve with garnishes of your choice; salsa, guacamole, lemon or lime wedges, cilantro, chopped tomatoes, etc.


For the Feta Dipping Sauce I just whirred up some feta, yogurt, lemon juice, a drizzle of olive oil, crushed garlic, salt and pepper, and bit of dry dill weed, in the small food processor until creamy.

It's such a versatile recipe, use any of your favorites cheeses and vegetables. It's quite satisfying and very flavorful.


Saturday

Darling Bakers ~ Cupcake Event

Saturday was our Darling Bakers CUPCAKE Event!


Inspiration and huge thanks goes to another blogger who authors one of my very FAVORITE baking blogs ~
my friend the irrepressible Em creator of The Repressed Pastry Chef .


I chose this recipe for Napoleon Cupcakes after seeing it on Em's blog recently. Click on the link, above, to take a look at how a real PRO makes, and photographs them. :)


The Yellow Butter Cake (recipe from the "At Home with Culinary Institute of America" cookbook) divided into cupcake portions are baked off, then filled with a rich pastry cream filling.


I finished mine slightly differently than Em did. She made an icing out of almond bark, a vanilla coating and chocolate stripes, beautifully elegant.


I made a white chocolate ganache for the topping, and heated and sieved raspberry jam for the stripes on mine.


The butter cake recipe is one of the best I've ever tasted, and I'll definitely keep it on file to make again. A big thank you to Em for sharing the recipe and technique on her blog!

And another big thank you to Jain at Once in a Blue Moon for organizing our Cup Cake-a-thon.


~~~~~~


*Sigh*

I really like cupcakes and love to make them, but because we've recently had to cut way back on sugar intake for health reasons, I won't be making them often, unless I can give them away.

So I'm left to reminisce about cupcakes from the past

(boo hoo...)

These are some from last year ~


Luckily, I don't have much of a sweet tooth... but still, they ARE so much fun to make!


A Sampling of my food . . .

Subscribe:

 Subscribe in a reader...or

Enter your email address:

Delivered by FeedBurner