Thursday

S'mores Halloween Treats ~ Ghastly Ghost Peeps®


Frighteningly simple to make ~ when Mary @ Home is Where the Boat is
first featured these, I knew I wanted to add them my repertoire too.  
So a friendly shout out and a big thank you to Mary.
Please go visit her blog, you're in for a treat!


The ingredient list is as follows: A box of Ghost Peeps®, you'll need
12 'ghosts' to make enough for an 8 x 8-inch baking dish. Butter, sugar,
pinch of salt, your favorite brownie recipe or boxed mix. About 1/2 cup chocolate
morsels, and 36 chocolate mini-morsels.


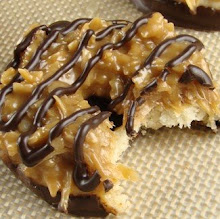
I hope you can see the layers here, on the bottom of the baking dish;
Graham cracker crumb crust, the brownie layer, chocolate morsels,
and topped off with the golden 'ghosts'.


Apparently ghosts are frightened of spiders.


Cutting between the 'ghosts' you have a perfect serving size for dessert.


They are quite RICH tasting, so maybe you'll want to share,
half, as I did.  (But probably not with any sort of Araneae.)


Happy Haunting!!
I hope you receive treats, no tricks this Halloween. :)


If you would like a printable copy of the instructions, you'll find it on
my recipe blog HERE.

Thank you for stopping by today~


Happy Halloween!!

Tuesday

Smoky Cheddar Spritz Crackers


As we were growing up our mother would make Spritz Butter Cookies 
almost every year during the holidays, and also cheese 'straws'
throughout the year.  Maybe your mom or grandmother did as well?


My sister and I followed the same tradition as we started our own
families, we would decorate the cookies in all sorts of pretty ways 
and sometimes with colored cookie dough ~ 
They are a perpetual favorite and always look
so festive on the cookie tray.


Sadly, my cookie press finally went kaput after many
years of use, so when I saw good reviews about this set
made by OXO I was compelled to replace my old Mirro
metal version.  Plus, I fell for the pumpkin disk in
the Autumn set. :)

OXO's great reputation and all of the unique disk motifs, 
its' ease of use and care sold me. 


The press comes with 12 decorative disks; all of the traditional
ones I remember -

snowflake, heart, wreath, tree, buttercup, daisy, etc.
as well as some, new to me (all really cute!) :

shell, sunflower, fleur de lis, bear (little teddy bear!), leaf, butterfly

See more about the press and other disks below.


~*~*~*~*~


Of course you can use any cookie press or disk to make these
delicious cheese straw crackers, follow your favorite recipe or
choose the one I favor (it's over on my recipe blog, link below.)

This is my favorite recipe for a savory cracker using
the cookie press.

Like most all Spritz-type cookies the recipe is really simple, 
just a bit more involved than a shortbread dough.  

But for the cheese crackers I jazz mine up a little
by adding 1/4 teaspoon dry mustard powder and 1/4 teaspoon
Turmeric (it adds a very subtle warm flavor and nice color.)

Sometimes I mix it up by using Smoked Paprika (as I did this time)
instead of plain sweet paprika.  If you like them spicier, increase the
amount of cayenne pepper, or hot paprika.


Tip for crispy crackers:

I like these crackers to be crisp, but not brown,
so after baking and cooling all of the batches, 
I place them in a single layer on the baking sheets
and place in a 175ºF oven for a several minutes until they dry out a little,
they will crisp even further after cooling. Keep an eye on
them while they're in the oven so they don't turn dark. 

Alternately you can place in your oven set to 'warm', 
or the lowest temperature available and do the same.  

Either way you choose, do watch them as ovens vary.

When the crackers are crisp, I turn off the oven and leave
the oven door open just a bit until the crackers are completely cool,
then store in airtight containers for up to a week or so.

These are really good served on the cheese/fruit tray or along with
soup or a salad. They make a nice gift from the kitchen, too.

If you give them a try, I hope you enjoy!

A printable version of the recipe and tips can be found on
my recipe blog by clicking this link.


~*~*~*~*~

Additional Disks for the OXO Cookie Press

Also available separately are two sets of additional seasonal disks,
(six disks in each set):  

OXO Good Grips Cookie Press ~ Autumn or Springtime ~ Disk Sets

The Autumn set includes: 
Spider, Web, Owl, Turkey, Leaf and Pumpkin

The Springtime set includes:
Cherry Blossom, Rose, Love, Double Heart, Shamrock, Bouquet


(You can click the link above to learn more)


Thanks for coming by today, friends.

Bon Appetit!

~m.


Note:  The folks at OXO don't know who I am, (no compensation from them.)
I'm just sharing a product I like... I hope you like it, too.  :o)


Monday

Spooky Eye-Popping Soup for Halloween


I saw this presentation on Home is Where the Boat is
a wonderfully creative blog by my friend Mary.  
If you're not familiar with Mary's blog I urge
you to go visit, you're in for a treat!


For the Spooky Eye-Popping Soup I made a recipe similar to this one; 
I used half lean ground beef and half Italian sausage, 
fusilli instead of tortellini, omitted basil leaves ~ 
I used a couple of pinches of dried oregano instead, 
and chopped the vegetables into small dice just so the 'eyes' 
would get most of the attention.  


If you would like an even simpler soup you may like this one
directions for making the eyeballs can be found here as well. 
I simply used bite size mozzarella (bocconcini) and placed 
thin slices of stuffed green olives on them to resemble 
pupils and irises. 


It's a fun and flavorful soup to help get everyone in the mood for Halloween.


Thank you for stopping by today friends ~
Have a BOO-tiful week!  :)

~mari xo

Wednesday

Korean-Style Minced Beef Bowl

Oh my, this is a MUST share!

I found the recipe on my long-time friend's 
(gorgeous) blog; La Table de Nana, by Monique.
She shared with us that she had discovered it on 
The English Kitchen blog by Marie.

Both Marie and Monique are blogging cooks that I admire, 
it helps that our tastes in food are quite similar.  If either of
these two ladies give a recipe high marks, I know
it will be popular at my house too. 


This recipe is very flavorful and it goes together in
just minutes (a quick meal, especially if you steam
some rice just before you begin to cook the beef.)
The bonus is ~ it's budget friendly!

I just tweaked the original recipe a little bit:

- I increased the amount of fresh ginger,
-Added a little very dry sherry (not cooking sherry) just before adding the soy sauce
-Added a teaspoon of white vinegar (or apple cider vinegar) with
the soy sauce (it piques the flavor just a bit.)


Click image to learn more.
Option to purchase if you cannot find it locally.

I used Sambal Oelek (fresh ground chili paste) instead of the chili flakes

The original recipe suggests serving it with sticky rice
(which would be perfect, and would make it easier to eat with
chopsticks)  I had Jasmine rice, so that's what I chose.


For garnish I added some julienned carrots,
a sprig of cilantro and a wedge of fresh lime, 
along with the sliced scallion in the original recipe.

If you like food with an Asian flavors, I am quite
certain you will love this one.


If you would like the recipe, please hop over to
Marie's blog, and say hello ... Here is the link.
or 

(http://theenglishkitchen.blogspot.com/2013/03/korean-beef.html)

Many thanks to Marie and Monique for sharing this
KEEPER! I'll make this one again and again ~
(it would make a wonderful filling for lettuce wraps too.)


I hope you'll give it a try.
Thank you for coming by today ~ Cheers!

Tuesday

Crispy Herbed Chevre with Heirloom Tomatoes ~ PLUS Easy Herb Batter Bread


We're getting down to the nitty gritty; the very last of the
tomato season here. After this it will be the hothouse
variety until next season.


I like to treasure these last few colorful remnants of summer in
the most simple way, to let their natural sweetness shine.


This presentation is similar to what Chef Jonathan Waxman introduced
way, way back at the beginning of California Cuisine, in the 1970's.  
Long before PCs were a household commodity I remember 
clipping newspaper and magazine recipes which featured 
this exciting nouveau style of preparing food ~ 
I think most of us "of a certain age" did the same. 


Practically unheard of here prior to that time, 
fresh goat cheese became all the rage, thanks to 
Laura Chenel in Sebastopol, CA. 
She was  America's first commercial producer 
of goat cheese in the US. 
 
 I remember meeting Laura around 1980 as she introduced her 
newly published cookbook (featuring, of course, goat cheese) 
at one of the first Williams-Sonoma stores to branch off from the 
original store in nearby Sonoma, California.

Those were exciting times ~ though we now take the 
concept of California Cuisine rather casually, it is important to 
remember that it was the start of a food revolution, 
heavily influencing the way we eat today.


I love the colors of a mix of tomatoes! But any kind of fresh,
ripe tomatoes you have will do, slice the larger ones and just
half the cherry or pear tomatoes.


Fresh and vibrant, this salad exemplifies the roots of
California Cuisine.  Chef Jonathan's method is very simple; get the
ripest, most flavorful tomatoes adorn them simply with
salt and pepper, lemon juice and your favorite nut oil,
such as walnut, hazelnut, etc.

Blend a couple of teaspoons or more of freshly minced herbs into
the goat cheese very well,  then form the herb cheese into patties 
(about 2 ounces each), one per each serving.  
Dip in beaten egg and then in plain breadcrumbs
which have been seasoned with salt and pepper. 
(You can use Panko crumbs if you like.)

Chill the patties or at least 1/2 hour in the refrigerator, 
(they will hold together during cooking a little  better if you chill 
them even longer.) 
 
When thoroughly chilled bake them on a buttered baking sheet 
@ 375ºF for about 8 minutes, or brown them in a little oil 
in a frying pan over medium high heat for a few minutes 
on each side, turning once, until they are nicely golden brown.

Place on plates or a platter, arrange the tomatoes around
the patties, sprinkle with herbs of your choice, salt and freshly
ground black pepper. Squeeze lemon juice or a little of your
favorite vinegar over and drizzle with nut oil sparingly.

Serve and enjoy while the cheese is still warm.


~*~*~*~*

Fast and Easy Herb Batter Bread

As an accompaniment I baked up some Herb Batter Bread,
it's from Sunset Magazine from about the same era.

It's a really easy yeast bread, so if you've ever felt intimidated
by yeast breads ~ try this one, it's practically fail proof!

 It goes really well with soups or salads, and any other simple meal. 


 I cannot count the number of times I've made this bread, 
but you can probably guess by the condition of my
1971 edition of the Sunset book. (It cost a whopping $1.95 then.)

Back then fresh artisan bread wasn't readily available as it
is today and homemade bread like this was a treat.

  You can mix it all up in your stand mixer, or by hand it is not
difficult and there is no kneading required.


I usually would bake the bread batter in a round cake pan, but this time 
I baked it off in a little rectangular pan. (About 6.5-inches x 10-inches)

I substituted about 80% of the all-purpose white flour with whole wheat flour.

It goes together quickly and is a fantastic recipe to have baking
when your loved ones or guests arrive at your home. The
aroma is so enticing!

Although we didn't know it then, 
the batter is very similar to a foccacia dough 
(which I didn't even know about years later.)

When it comes out of the oven the top is brushed with melted butter
and sprinkled with a little coarse salt to heighten the flavor of the herbs.


You can use any herbs you like, fresh or dried. In addition to the
herbs I usually always add some minced dehydrated onion to the batter.

A little butter melting on the baked, warm bread, and you just about
have heaven on a plate!  


It makes a really good little luncheon dish, or light supper,
and brings back a flood of memories of my early cooking
days.


~*~*~*~*~


If you try either or both of these, I hope you'll love them!

If you would like a printable copy of the Herb Batter Bread,
hop on over to my recipe blog ~ HERE.


Thank you for coming by today, I really appreciate
your comments. 

See you next time~ 
~Mari  :)

Sunday

Postcard ~ Near Home


A Glorious Autumn Afternoon
along the river.

Wishing you a very good week ahead, friends!


~mari   :)

Friday

No Trick ~ Healthy Treats!


Elise, over at Simply Recipes recently shared a Cinnamon-Sugar
version of these baked sweet potato jack-o-lantern treats, 
and I knew I wanted to try them right away.

They are fairly easy to do, but just a bit time
consuming ~ 


First of all, try to find uniformly
cylindrical shaped sweet potatoes that are of a good
sized diameter.


Photo: Columbia University


Peel the potatoes and slice crossways into
 1/4-inch thick slices.
You can cut the pumpkin shapes out with a
pumpkin cookie cutter, but my pumpkin cookie cutter
was too large so I used an exact-o craft knife 
(a very sharp paring knife would work, too.)


Next you can cut shapes out to represent
eyes, nose and mouth*... 
make the expressions spooky and scary if you dare. 

I wanted gentle faces to please the youngest among us. :D

*You can skip this step if you want to,
because it is fiddly work ~ and definitely best
left to adults to do.


Lay the pumpkin cut-outs on a parchment (or
silicone-mat) lined baking sheet. Elise instructs to
bake them (as is, no oil or butter)
in a very hot oven for about 35 minutes
until they are golden brown.


I did not want them to discolor much, so I brushed
them lightly on both sides with melted butter*, baked, uncovered for approximately
5 to 10 minutes (until the bottom edges begin to bubble and become a little crisp.)
  Then I loosely tented the pan with aluminum and baked 
them in a 375ºF oven, for about 10 minutes until the sweet potato 
cut-outs were tender, but still holding their shape.  Remove
the aluminum foil and bake an additional 5 minutes if you would like the texture 
to be a bit firmer. The baking time will depend upon your oven, the
moisture content and thickness of the sweet potatoes, so watch and
adjust accordingly.

*(you can use your favorite oil if you prefer)


I would be perfectly happy serving them just like
this ~ but maybe your young ones would like them
a little sweeter. In Elise's version, she instructs to dip them into
melted butter and then cinnamon sugar to coat.


This version is  moist  and tender, easy for young ones to eat.
 I simply sprinkled cinnamon sugar over and placed them on a rack and allowed
them to set up a bit.  These are best served the day they are made.

If you want them drier and a little chewy, I suggest
you bake them in a hot 425ºF oven for longer, until they take on some
color and dry out a little, then dip them in melted butter and
then cinnamon sugar, the way Elise suggested.


An 'almost' guilt free snack ~ I hope you enjoy !


Have a wonderful weekend, friends.

xo~mari


Tuesday

Spiced Pumpkin Cake with Maple Frosting


There are still some tomatoes on the vine, but our first frost is
just around the corner . . . might as well face it,
we're feeling the nip of Fall in the air.
We've already been lighting up the wood stove
to take the chill off of the mornings and evenings.

And as much as I detest the shorter days and less
sunlight, there are some things I do love about Fall.
Baking is one of them.


It is a welcome excuse to crank up the oven and bake at this time 
of year and the payoffs are plentiful:

Warm kitchen... 
delightful aromas... 
comforting, cozy atmosphere...
good food to look forward to...
satisfied tummies...
Happy memories...

All of the above make for warm fuzzies
and a happy family. :)


In summer we have all kinds of fresh fruit
to keep a sweet tooth satisfied, in the
cooler months we must become a little
more creative.  Apples, pumpkins, pears
and preserved fruit to the rescue, and soon
the citrus will become more abundant.  I've
been baking some apple sweets which I'll
share soon, but in the meantime . . . 


This is a simple little sheet cake, you can use
canned pumpkin (plain, not pie filling), or cook your own pumpkin
or squash. Since I had a can of pumpkin open
for another recipe, I decided to make this little
cake. It doesn't take many ingredients and
it goes together quickly.


The original recipe yields a 9x13-inch cake pan,
but we don't need that much cake at once so
I made a half recipe and baked it in a 9x9-inch pan.
If a 9x9-inch cake is still too much for you,
you can bake it, then divide it in half, wrap well and freeze the half
and enjoy the other half immediately.
When you want to serve the remainder, thaw and spread the frosting on 
when it's completely thawed, or just sprinkle with powdered sugar.


The frosting is made with pure maple syrup, cream cheese
butter and powdered sugar and a little vanilla extract.  
The maple flavor is very mild, if you like it more pronounced 
you could add some maple flavor extract . . . but I try to avoid
the artificially flavored stuff, so I don't. 

I reduce the sugar amount by a bit, because I don't care for overly 
sweet things, and if you reduce the cream cheese by a tablespoon or so, 
the maple will be a bit more prominent.


I serve the toasted chopped pecans in a little dish with a spoon,
on the side since many people have trouble digesting them.
This way it makes everybody happy.

Perfect with a cup of tea or coffee, and it makes
a fine little dessert.
  
If you would like a printable copy of the recipe,
it's over on my recipe blog . . .

Click here.

Thank you for stopping by ~ I would love if you
would leave a comment so I know you've visited!

Blessings!

~mari  :)
 

A Sampling of my food . . .

Subscribe:

 Subscribe in a reader...or

Enter your email address:

Delivered by FeedBurner