Monday

Marcella Hazan's Roast Chicken with Two Lemons ~ A Tribute to Marcella


Hello Friends~
 
It was with much sadness that we fans of Marcella Hazan learned of her passing on Sunday morning, September 29th. 

I cannot begin to express how I admired Marcella and appreciated how much she shared with us through the years. 

With thoughts of Marcella I wanted to share one of the first recipes of hers that I ever made so many years ago after watching her prepare it on television in 
San Francisco. 


This is a repeat of a post that I published a couple of years ago,
the chicken remains one of my all time favorites.


From the moment I heard of this method of preparing a roast chicken well over 20 years ago,  this has remained one of my family's favorites. It is definitely my personal favorite, and if I could only roast a chicken using one method for the rest of my life ~ this would be it!  It's that good.

If you are fortunate enough to get a chicken with skin entirely intact (no tears, or holes) ~ near the end of roasting time the skin will puff up dramatically and have become crispy while the chicken beneath the skin remains juicy and succulent ~ as this one did. (But by the time I got the camera out it had deflated, no worry though because the chicken is delicious just the same.) Perfectly flavored whether served from the oven, or at room temperature.


It's a classic and simple recipe from one of my favorite cooking teachers and cookbook authors, Marcella Hazan.


One whole chicken, two lemons, salt and a little freshly ground black pepper produce some of the most succulent pieces of chicken you may ever taste.
I love Marcella's recipes, and although some may seem to be quite an undertaking because of the length ~ please don't let that put you off. It simply appears so because Ms. Hazan is such a great teacher that she explains each step and exactly why they are necessary to produce the desired results, which is enormously helpful, especially for a new cook.


The method is simple ~ rinse the chicken well, inside and out. Allow to drain for a few minutes after rinsing, then blot dry with a cloth or paper towels. Remove any visible bits of fat in the cavities of the bird and salt generously, inside and out. Sprinkle with freshly ground pepper.
Roll the lemons between your hands or on a counter to help release the juice. Poke the lemons many times with the tines of a fork or a wood pick.
Place the pricked lemons inside of the cavity of the chicken and secure with a couple of tooth or food picks. I tie the legs together with a bit of twine to help keep the chicken compact and the lemons in place.
Then roast, at first breast down, then turn over to continue roasting until done~ the chicken is self basting, no need to add fat or to baste.


Serve along with the succulent juices ~ and you'll probably taste one of the best roasted chickens you've had in your life.


Hint...Hint...Hint:


Sometimes the skin of the chicken breast will stick to the pan during the first part of baking (as the chicken is roasting breast-side-down.)

To prevent this~  

I cut a small piece of parchment baking paper, brush with olive oil or butter and place it on the roasting pan beneath the chicken breast where it makes contact with the pan.  When it is time to turn the bird over to continue baking (when breast side is UP) just remove the parchment paper. Yay! No stick, and NO torn chicken skin.


Forever grateful to Marcella Hazan for all she has shared! I have several of her books, which I value highly ~ here is the first I ever purchased and I recommend it. 


~*~*~*~*~

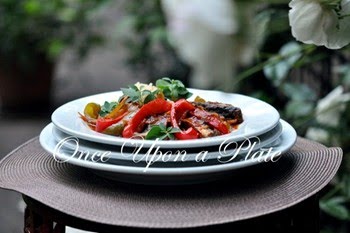
You probably noticed I roasted the chicken in one of my favorite cast iron skillets.  Not fancy at all, but of all the roasting pans I have... stainless, porcelain, Le Creuset or Staub ~ I reach for my Lodge cast iron skillet almost every time for small roasted meats like this - just as my parents and grandparents did before me. It's just large enough to add a few potatoes and/or carrots around the meat while roasting. 

Readily available almost everywhere (amazon.com has a good selection) 
Lodge Logic-- comes already pre-seasoned.  Just hand wash it and it is ready to use.  I love my collection of great quality cookware ~ but I would never part with any of my black cast iron ... they heat evenly and are indestructible workhorse pieces in my kitchen.

The actual recipe:

I haven't asked for permission to share the exact recipe, but you can find it HERE on the Internet.  If you try it, I hope it becomes one of your favorites, too.

Thank you for stopping by today ~ and I would love it if you would leave me your thoughts or any comments, I cherish each one. 


~ Rest in heavenly peace, dear Marcella. ~  


Rustic and Hearty Tuscan-style Soup


When damp, chilly weather arrives we crave warming
soup at my house, and this one is right up there among
the top favorites. I've shared this one before and I understand
it's similar to, (or a copycat version of) Toscana soup as served
at the Olive Garden restaurant. I can't vouch for that as
I've never had it there.

Even though I enjoy soup at any time of year,
 I only make this particular recipe when the temperatures are cool ~
it's very hearty and filling, almost like a stew.


As you can see, the ingredient list is
simple; no exotic items and surprisingly, for such a
flavorful outcome, you don't need to add extra seasoning except
for some salt and freshly ground black pepper.

I always increase the amount of veggies in the recipe
as I prefer this soup chunky, and we all know they
are good for us. :)


You can have this on your table within about 30 minutes.
It's wonderful eaten straight after cooking it, and as with
most soups it is fabulous reheated the next day. When
reheating I usually add more of the greens just to liven up
the color a bit.


It won't win any prizes for beauty, but for what it lacks in
visual appeal it more than compensates in satisfying
flavor.  I hope you'll give this one a try, it has to be
among my top favorite 5 soups --- maybe in the top 3.

You can get the printable copy of the recipe over on
my recipe site.


I'm so happy you came by to visit, have a lovely day!

~ mari


Wednesday

Acorn Candy Kisses


These are pure fun! And a good project for the kiddos ~
you can "glue" the pieces together with thick Royal Icing,
a little melted chocolate or peanut butter.

If you can find the "Pumpkin Spice" Hershey's Kisses
they make the acorns a bit more realistic as they
are a light caramel color.  I couldn't find them in my area
this year so I used a mix of plain milk chocolate kisses
along with some of the caramel filled type (really good, but
sweet ~ I like them because the caramel filling is liquid,
not chewy.)


I am really happy you stopped by and
thank you for any comments you would like
to leave. I appreciate each one and I would love
to come visit your spot on the internet.


Happy Autumn!

Friday

Psomi Spitiko ~ Easy Homemade Greek Bread


Easy Homemade Greek Bread ~ Psomi Sitiko
In Greek: ψωμί σπιτικό, pronounced psoh-MEE spee-tee-KOH

This is the bread that I made the other day in my post about
Greek-Style ribs  (and here.)  I've made it a total of four times in the past
few weeks ~ it's the kind of bread usually found at the Greek
Festivals I have attended.  It's a very good plain bread (not sweet)
and the texture is agreeably soft, good plain at room temperature,
it's delicious warmed or toasted too.


For breakfast or a snack with tea a little jam or honey is delightful

I like the recipe because it makes 2 smallish loaves, 
each weighing about a pound, and the dough doesn't require two risings
so you can have delicious fresh bread in a little over an hour.
Because of the unique method of making this bread 
using an electric bread maker would be problematic.
But it is really easy to make ~
you can do the entire recipe by hand, or use a stand mixer.


The technique is a little different than most traditional
bread recipes in that you mix about one-half the total amount
of flour with warm water, yeast, olive oil and salt in
a bowl, then cover the bowl tightly with
plastic film and allow to rest at room temperature for 30 minutes.

Then mix in the remaining flour (I use the dough hook) on
the stand mixer, then just knead in a bit more flour so the
dough is not overly sticky, dividing the dough into two pieces and
form each into any shape you like. 

After making it a couple of times I found that I prefer the
dough a bit stickier than most bread doughs for the best texture
(you'll need to flour your hands and work surface well.)

Place on parchment lined baking sheet  -- at this point you may
slash top of dough for a little higher rise, or brush with water
and sprinkle or apply sesame seeds with your fingertips.


And the most unique aspect of the recipe is that the shaped 
dough is immediately placed into a cold oven. 
The oven is turned on to 425º(F) / 220º(C), 
the dough actually makes it's second rise IN the oven, as it is 
heating up.  Bake time is about 30 minutes. 
My ovens run a little hot so I begin checking at 20 minutes.

If you give this one a try, I hope you like it as much as we do.

Recipe and instructions can be found here.

Have a wonderful weekend everyone!

xo ~mari


Wednesday

Minestrone ~ A Lighter Version


I saw this recipe on my friend Monique's beautiful blog
La Table de Nana recently ~ it looked so good
and full of fresh veggies that it made me want to make it
right away.  

But we've had the hottest summer on modern record
here, so I had to put it off for a few days.  Now that the overnight
temperatures have begun to 'fall' (pun intended),
the time was right.

I was so surprised when I opened the link to the recipe,
because this is nearly identical to the vegetable soup
I make ~ except I never use an exact recipe. So I was
really happy to see the it with actual measurements to
share with people who don't use my cooking method.


As Monique did,  I substituted chicken broth/stock
for the vegetable stock ~ so if you want a vegetarian
version, use the veggie stock.

This one always pleases, and it's got lots of gorgeous
color so it's healthful and pleasing to the eye as well.

Since it's zucchini harvest time, I also swapped out the
spinach (or other greens) for this version.
If you want more protein, add some leftover cooked chicken,
Italian Sausage, beef (ground or cubed) during the
last few minutes to heat through, before serving.


These "Pesto Crisps"?

Meh, they were just okay. 
The recipe sounded good as I ran my virtual tongue over it...
all the ingredients you would find in pesto; fresh basil, 
Parmesano Reggiano, garlic, pine nuts, olive oil ~ 
plus a little flour and aged white cheddar.  

Thumbs down at my house.
Instead of eating them along side as you would crackers, 
I ended up breaking them up and floating them in the bowls of soup ~
(not pictured...)

If you want something similar, I would recommend
this version ~ similar, but a bit different and infinitely better.
Tried, true recipe ~ everybody gobbles them up!


But the soup gets 5 stars!


Thank you for finding the recipe and sharing it Monique!
And thanks to everyone for stopping by today.

Your comments make my day.  :-)


Bon Appétit!


Saturday

Those Fabulous Greek-Style Ribs


I've posted about these delicious ribs before
 it one of my favorite recipes for baby back pork ribs.
(I don't post pictures of them each time I make them
because we do have them rather frequently.)  :0)


As I explained in my previous post about
these succulent rib, I got the recipe from my friend
Ann of Thibeault's Table
--if you click the link you can get the recipe.


The method is quite simple ~ you make a
rub of salt, pepper, oregano, garlic, olive oil and lemon zest,
rub it into the baby back pork ribs and allow them to
rest in the refrigerator. If I have planned ahead I
do this the day before I am going to grill them, but
if you only have a few hours, that will do.

Shortly before grilling, squeeze lemon juice over
the ribs (don't do this part very far in advance or
the acid in the lemon juice will alter the texture of
the rib meat.)


Another thing that I always do to any ribs I am
going to prepare is to remove the tough membrane
from the bone side of the ribs. This allows the
rub/marinade to penetrate the meat more throughly,
and the membrane is not pleasant to eat anyway.


In this image I've already removed it ---  it can be stubborn, but if you begin at one edge and 
get it started it usually will peel off in one sheet. (You can use a dry kitchen cloth or paper towel
to assist in getting a good grip on the membrane.)


Then just grill as directed in the recipe~
you can also bake them in a 375º to 400º(F) oven.
(I like them best when grilled, but in a pinch . . .)


This time I served them with a Greek-style pasta salad;
Pasta, Feta cheese, Cherry tomatoes, Kalamata olives, 
orange bell pepper, roasted eggplant, cucumber, purple onion and
parsley, tossed with a red wine vinegar vinaigrette.
I can make a meal out of the salad alone (sometimes I add
some grilled shrimp to the salad and serve it as a main course.)


I also made some Greek bread to go with the meal,
very good. The kind that's usually served at the Greek Festivals I've
attended. Soft, but not like 'bubble gum' bread. The sesame seeds are
optional but I always make one loaf with, and one without.
It's also good as sandwich bread and is marvelous toasted, too.  
I'll share that recipe in the next few days.


The rub/marinade is also really good on prawns,
fish and chicken, you only need to allow those to marinade
for 20 minutes to an hour before adding the lemon juice.


Thanks for stopping by ~
Bon Appetit!

~~mari


Thursday

Raspberry Cheesecake Ice Cream


My stars!


I love, love, love this one.
If you're looking for a recipe for heavenly ice cream,
I urge you to try this one.


I must say, I am not overly fond of cheesecake.
For example if we're dining out I'll usually choose anything
other than cheesecake if there is a choice.


I don't dislike it, in fact I have a killer recipe for cheesecake
that I've been making for years ~
but it's just not my favorite dessert. So I was
really surprised that I LOVE this ice cream, as
it's reminiscent of a delightful, not-too-sweet
raspberry cheese cake.


The ingredient list is short ~

a little cream cheese
whole milk
cream
sugar
raspberry puree 
(I used frozen, unsweetened raspberries, pressed through a sieve)


Once you make it, you won't need a written recipe!

Now my mind is spinning, and I'm thinking of all
of the other fruit purees that could be used in place
of the raspberries... YUM!


I'm usually a "one scoop", or at the most
"two scoop" ice cream girl --- but not with this ice cream. :)


I'm thinking graham cracker sprinkles might be a
good finishing touch if you want to carry the
cheesecake theme, but absolutely not necessary.


I hope you'll give it a go.  And if you try it with another
pureed fruit, please let me know!


To get a printable copy of the recipe
click HERE to go to my recipe page.


Thanks for stopping by, and for any comments
you would like to share.


Have a delicious day!

~Mari


I'm sharing on Foodie Friday

and 

Pink Saturday !

http://howsweetthesound.typepad.com/my_weblog/

Monday

Fall Grape Salad with Blue Cheese and Walnuts (or Pecans)


In my area of the Pacific Northwest the weather is really lovely
 as we transition from summer to fall. 

 Vegetable and fruit gardens are giving their best and 
we seem to appreciate their bounty more ~ soon it will be
time to put the garden beds to rest for the winter, the
trees will drop their leaves and become dormant.

Although the days can warm up to the 80's and 90's ~
the evenings cool down to to low 60's making sleep comfortable.

Still spending lots of time outdoors during the day
we look for easy, light meals ~ salads always seem fit the bill.


The first one I'm featuring this week is one I've made for several years,
you've probably seen one like it or a variation ~
it goes well with grilled food, or as a salad meal by itself.


No recipe needed, just wash and slice your
favorite combination of seedless grapes in half, slice
some celery, tear some romaine lettuce into 
bite-size pieces (I used baby romaine),
crumble some blue cheese (can use feta cheese,
goat cheese, or any cheese you like; if using a firm
cheese, it works best if you dice it rather than shred
it as it will hold it's shape and texture better.)

Instead of walnuts you can use whatever nuts you like.
I always toast them in a 350ºF oven for a few minutes until
lightly golden and fragrant.  As they cool they will become pleasantly
crunchy and much more flavorful. 


Almost time to buy more.  
(Hint: Always keep opened nut oils in the refrigerator, 
they go rancid rapidly at room temperature.)


I always dress with a light vinaigrette  (I use Julia Child's recipe) just before serving.

If you have a nut oil that complements the nut you are
using in the salad, by all means use it in your vinaigrette.
But if not, grape seed oil or any neutral oil works well for this salad.

You can prepare this salad a couple of hours ahead (covered and refrigerated),
 but do not add the toasted nuts, cheese, or dressing 
until the last possible moment for best results.


I hope you're enjoying these final days of summer too.


Thank you for stopping by ~ 
your comments make my day!


~ Mari


A Sampling of my food . . .

Subscribe:

 Subscribe in a reader...or

Enter your email address:

Delivered by FeedBurner