Tuesday

Honey Sesame Chicken (Slow Cooker) and two other things . . .


First of all:

 Thank you - for leaving kind messages and emails for 
positive thoughts, prayers and good wishes as we ushered 
our sweet Black Labrador from this life. 

Please accept my deepest thanks.  
Your kindness and understanding has been so appreciated.  
A little more about our pal at the end of this post.


Second of all:

Blog connection problems!!
 With NO thanks to Blogger/Google.  :(

There has been a snafu with my domain name onceuponaplate1.com.

I am attempting to retrieve it, but in the meantime I've reverted
to "www.onceuponaplate.blogspot.com", so if you have had
difficulty getting feeds or connecting with my blog -- that is why.  

If you can change your address book/connection to 'www.onceuponaplate.blogspot.com'
we'll be able to keep in touch.
  
Thank you!! 

And enough of that business.


~*~*~*~*~

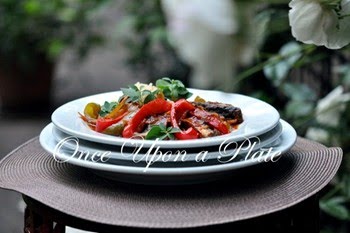
Ah, this difficult time and dreary weather seemed to cry out for comfort food, 
so when I happened upon this recipe I knew I wanted to try it.

Originally found at Baby Center (click), it was adapted by a another blogger 
Tessa @ Handle the Heat (click)

Both versions looked good but
I wanted to pump it up slightly to give it more of an Asian edge, 
which we prefer, so I added a couple of tweaks to suit our taste.

The original recipe called for boneless/skinless chicken breasts... 
but for slow cooking I prefer boneless/skinless chicken thighs ~ 
they are more flavorful and can stand up to slow cooking more successfully 
than breasts. Thighs remain moist and tender during the long cooking period.


I followed Tessa's (Handle the Heat) recipe fairly closely, 
but I did make these changes:

- I tossed a couple of slices of fresh ginger into the slow cooker
- I used the ketchup called for in original recipe, 
(if you are avoiding corn syrup use an organic brand that does not include it.) 
(Or do as Tessa did and substitute tomato sauce.)
- Increased the garlic to 3 cloves, minced
- Increased the cider vinegar to 3 teaspoons (1 Tablespoon)
- Added a couple of splashes of Dry Cocktail Sherry 
(may substitute Mirin instead~ Japanese cooking wine for the sherry)
- Increased the sesame oil to 2 teaspoons
- Along with the scallion garnish I added fresh Cilantro sprigs

As always, I recommend you adjust the seasonings to your own taste, of course. :)


I hope if you try this recipe you'll love it. It reheats and freezes well 
(sans the garnishes), so you can make ahead and have it on hand.
 Simply warm it up and sprinkle with the fresh garnishes.  
Serve over rice, noodles, or your favorite grain.

It's also a fabulous filling for lettuce leaves or small sandwich buns.

You can find both recipes via the links above ... 


I believe you will like this method of preparing chicken.


~*~*~*~*~*~


(© original oil by John Silver, UK)*
Original is available, click the above link to learn more.

My Pal

The good news is the Veterinarian was 'off' in her estimate of 
the amount of time our pup had remaining.

Our boy actually enjoyed an additional several weeks of a good, 
happy life beyond what was predicted, tail wags and all. 

We made every effort to make sure he enjoyed each moment, 
doing things he liked, eating well, going for rides in the car, 
sleeping comfortably, being loved; he was able to remain 
free of pain and discomfort until the very end.

May we all have it so when it's our time.

Here is to 14 splendid years of love and companionship.
Not a mean bone in his body . . . he was a good boy.

The tough decision was made Monday morning February 3rd ~
he was such a wonderful dog, very much loved, 
is sorely missed and will remain forever in our hearts.

~*~*~*~*~*~


* ©The Art of John Silver, 
Fine Artist, U.K.

Please visit Mr. Silver's site, JSFA (The Fine Art of John Silver) 
(http://www.johnsilverfinearts.com/) to see more of his exquisite work.

You may order prints, originals, or contact to
perhaps commission an original painting.
Shipping is available worldwide from the UK.*

For more information:

http://www.johnsilverfinearts.com 
http://john-silver.artistwebsites.com
 http://www.johnsilverfinearts.co.uk

Disclaimer: Mr. Silver has no idea who I am; 
I receive no compensation for recommending his work. 
I'm just a fan, entirely captivated by his incredible talent. 
~*~*~*~*~*~

Thank you for coming by today friends!
I wish you peace and happiness.


Follow my blog with Bloglovin

Wednesday

Roasted Carrot and Fresh Ginger Soup


Here's a comforting* soup you can pull together when 
there is practically nothing in the refrigerator or pantry...
and you are busy. With other things.


Besides being healthful and budget friendly,
the additional bonus is that it goes together quite quickly.

All that is required are a few carrots, an onion, clove of garlic, 
bay leaf, chicken or vegetable broth or stock, oil/butter, 
salt and pepper ~
and fresh ginger (which I always have on hand for
cooking and use in smoothies.)


*I've been needing extra comforting recently,
and I'll explain why at the close of this post  . . .


The method goes like this:

Peel and cut the carrots into large chunks, toss with oil and 
roast in hot oven until tender.

Sweat chopped onion in a large pot, when translucent add minced garlic and
minced ginger for just seconds. Add broth/stock to pot, then bay leaf
and roasted carrots carrots. Add salt and pepper. Bring to a boil,
then reduce to a simmer, cook for 20 to 30 minutes.
Remove bay leaf. Taste and adjust seasonings.

Using either a blender (or an immersion blender) puree the
contents of the pot until silky smooth.

At this point you can stir in some heavy cream to make it creamy,
or a tiny amount of Harissa sauce (to make it spicier),
a little finely grated orange zest


Garnish as desired;  here are some suggestions:

For each individual serving:
Shelled, roasted pumpkin seeds ~ (Pepitos)
a little lump of butter
finely chopped chives
finely grated orange zest
a small dollop of sour cream
toasted chopped nuts of your choice
buttery, crisp croutons
a tiny sprinkle of nutmeg or cinnamon


If you would like a printable copy of the recipe you


~*~*~*~*~*~


You may be familiar with the seasoning Harissa
the North African spicy red paste (or sauce),
if not here is the kind I use. (If you cannot find it locally, it's available
from amazon.com.)  It is really convenient to keep
a tube in the refrigerator to add a good, deep spicy 
flavor to all kinds of dishes.  You can also make your own,
but I don't use it that frequently so the tube version is the
way to go for me.


Word of warning ~ 
Do taste whatever brand you choose before
adding it to your recipe ~ it is potent!!


~*~*~*~*~


I've been a little distracted lately, 
my old faithful friend ~ my Black Labrador dog whom I've had
since he was just a little over 2 months old 
has been having some health issues, surgery, etc.  

It was non cancerous, he healed very nicely. 
He has been doing well for over a year.
and behaves much younger than his 13 years. 
Friendly, full of life and character, but so gentle and easy-going.

Sadly we recently learned he has bone cancer in his
foreleg... it is inoperable and the Dr. estimates the blasted
cancer will take over within 4 to 6 weeks. He is doing fine
at this time, on pain meds, and we will not allow him to suffer.
Lots of extra TLC being showered upon him now, while he's with us. 

Too soon 'THE' decision must be made, 
thus, the gray cloud hangs overhead. :(


Being "dog people", the news has affected us deeply ~ 
spending much more time with my pal, and not
so much the internet, or other things.

If I've neglected visiting your blog, or responding
to your lovely comments, emails, etc. I hope
you'll understand.  I'll try to do better.
Thanks for listening (reading!)


Thank you for stopping by today friends,
enjoy each minute of the day.

xo  ~Mari


Friday

Antipasto in Crispy Bite Size Salami Cups


When I saw this idea for an appetizer on 
the Columbus® Facebook page, I knew I
wanted to try it out.  Of course I tweaked it just a little.


A San Francisco tradition established in 1917
Columbus® products have been a favorite in my 
family for years and years. I particularly have fond
memories around holiday time when our dad would buy and 
bring home big sticks of salami from San Francisco on the train--
for gifts and snacking. 

(His job was in San Francisco and he commuted each weekday
 to and from our home on the SF Peninsula for dozens of years.
It was always treat to meet him at the train station at 5:25pm as he
stepped down from the train, neatly
dressed in suit and tie ~ briefcase in hand . . . 
 especially on the days when he had those big
paper-wrapped sticks of salami tucked under his arm! )


To make the 'cups' the pre-sliced Genoa Salame
works best because the diameter is larger than regular 
salame so it is easier to work with 
(the slices tend to shrink when baked.)

To bake, pre-heat oven to 375ÂşF. Tuck one slice
of salami into a small mold and press in.

I used these little Brioche molds but mini-muffin pans
work very well too. I found that sandwiching the
salami slice between two molds helps them hold their
shape while baking.


 If you have 2 identical muffin pans, put the
salami in the cups of one and carefully stack and press the 
second pan into the first, which will help keep the 
salami in place while baking.

Alternately, you can make small 'balls' out of aluminum foil and
place/press each of them down upon the salami slices in each mold ~
then bake. Personally I feel that is really wasteful, 
and would just skip this recipe and serve antipasto 
on a platter or plates instead.


Bake for 10 minutes or so. The salami will begin to
hold the shape of the mold as it begins to crisp in the
oven. It's best not to over-bake or the salami cups 
may shatter when it's time to fill them. 

(Hint: Place the molds or muffin pans on
a parchment or silicone lined rimmed baking sheet to catch
any drippings.)

When baked, remove from oven, allow to cool a moment,
it's helpful to turn molds or muffin pan upside down
to finish cooling. Before they are completely cool 
remove the 'top' mold or muffin pan.

You can make the "cups" a few hours up to one day
ahead, storing in air tight container.


Next, choose the fillings for the cups, 
just gather your favorites from
items found on the antipasto platter.

I chose:
 Black olives (brined), pitted and sliced in half
Pepperoncini, sliced
Roasted red pepper, sliced into small pieces
Marinated artichoke hearts, cut into small pieces


And some cheese goes really well in these cups.
I used the tiny, fresh 'perline' mozzarella ("pearls"),
but you can just cut other mozzarella into small
cubes. Or use another favorite cheese.

The cups themselves are rather salty and I think the
mozzarella is a good smooth contrast to the saltiness of
the other ingredients.


There are plenty of other options for fillings,
here are just a few:

Garbanzo beans (from the can, or home-cooked)
Sun dried tomato slivers
Pimento stuffed olives / other olives
Tiny cocktail onions
Small chunks of tuna or slivers of anchovy
Feta or Gorgonzola cheese crumbles
Scallions (thinly sliced)
Grape or Cherry tomatoes (sliced)
Fresh red or green bell pepper (slivered)
Marinated mushrooms (drained, and sliced if large)
Golden or brown raisins, (a few in each cup adds a nice contrast of flavors)
Bits of fresh parsley or basil leaves
Capers
Sliced tiny pickles
Slivers of red onion
Thin slices of carrot

Truly, whatever strikes your fancy.

~*~*~*~*~


How do you spell it?

Salami or Salame?

You be the judge ~ 
it seems there are varying thoughts here in the U.S.


photo credit: wikipedia
Antique Hungarian Salami Poster


Use your favorite brand of Salami in the recipe ~ I prefer the Genoa
type simply because of it's larger size; uncooked the kind I used
is about 3 1/4-inches in diameter, after being put in the mold
(plus shrinkage during baking) the cups are about 2 1/2-inch in
diameter measured from the widest points at the top of
the salami "cups".

If you make these, I hope you like them.


Thank you for stopping by, your comments make my day!

~Mari :)


(Full disclosure:  No recognition or reimbursement of any kind 
has been received from Columbus® products for featuring
their products in this post. I just happen to like their products.)


Sunday

Chicken Enchiladas (Slow Cooker Mexican-style Chicken Meat and Seasoning Mix)


Today I'm sharing my favorite Mexican-Style chunk/shredded
chicken that can be used in a variety of ways.

The good news is ~ 
It can be made in your slow cooker.
You can make just what you need 
or make plenty as this freezes really well.  
Just portion into freezer safe containers or plastic bags 
in the amount you'll need for each meal.


Use it for filling for:


or in 

Mexican-style Chicken Salads
Mexican-style casseroles
Mexican-style Soups (Caldo de Pollo)
Chilaquiles
Mexican Sandwiches Tortas
Spanish-Portuguese-style Migas
Colombian and Venezuelan-style  Arepas
In omelettes and frittatas
Also really good served warm over rice with melted cheese.


To season the chicken you can use a commercial
packet of Taco seasoning ~ but I really recommend making
your own.


 It's very simple, just combine the dry ingredients (you probably already
have them in your spice collection.)
This tastes much better than the commercial version 
and you know just what goes into the seasoning you make. 
You can control the degree of spiciness you prefer, 
as well as the salt content. 
Plus you can avoid preservatives, chemicals and artificial colors.

 For the Taco seasoning mix recipe Click here.
I always quadruple the recipe and store in an airtight jar 
and keep it with my spices.


To cook the chicken using the slow cooker:

Click here for the Mexican-style Chicken (Slow Cooker) recipe

You can use the chicken pieces you like best. Some prefer
boneless chicken breasts, but I prefer using bone-in, skin-on for
the extra flavor those pieces provided. (After the chicken is cooked
the bones and skin are easily discarded, then I skim any excess
surface fat with a spoon ~ or you can chill the boned/skinned cooked
chicken and broth and lift the solidified fat from the broth.)


If you are using 1 pound of boneless chicken breasts, 
this can usually be ready in less than 3 hours. 
But this depends upon the amount of chicken you are cooking,
the size of your slow cooker and if using boneless chicken
or not.

When using other pieces, I do cook longer to compensate for the
thicker pieces and bones, beginning on high for a couple of hours, then
shifting to the low temperature setting.

I cook until the chicken is very tender, until it easily be pierced, 
and using forks or your fingers, can easily be removed from the bones 
(but I make sure not to overcook so it remains moist and
flavorful, not dry and stringy.)


You can see that if I'm going to freeze some of the meat, I don't really shred it, but leave it in chunks. 
The quality seems better when frozen in larger chunks 
(If I use it shredded, I do so just before adding to the recipe.)


Here it is again, already to eat or use in your favorite recipes, skinned, 
boned, broken into large chunks after cooking. 
I de-fat the delicious, flavorful broth and spoon some over 
the chicken that will be eaten that day.

I divide the remainder, spooning it over the cooked, chunked chicken 
in each container before freezing. 

Besides being ready to use in your favorite recipes, 
it is delicious served over rice, or rice and beans. 
You can use some of the broth to flavor the cooking liquid for your 
rice and beans, too. 
I divide the remainder, spooning it over the cooked, chunked chicken 
in each container before freezing. 

The recipe for the seasoning and directions for slow cooking the chicken
can be found here
(Again, I always increase the amounts so I can have plenty of left-over chicken and broth to freeze.)


I don't freeze many things besides homemade soups/broth, marinara,
and pizza/bread dough, but I do freeze this. It is so handy to have on hand,
and tastes delicious even after freezing.


And here it is transformed into simple Chicken Enchiladas ~
for this version, I just warm some to the cooked chicken in a pan with
some broth, dip the corn tortillas in hot oil (until they are flexible) and
drain them on paper towels.  While still warm I fill the tortillas with
the chicken meat and roll them*. 

Secure with a toothpick if necessary and
place in baking dish (or place them in baking dish, 
seam side down so they do not unroll.) Spoon some enchilada
sauce** over and sprinkle lightly with shredded cheese.
Cover very loosely with foil and warm in a preheated 350ÂşF oven 
until hot throughout and cheese garnish has melted. This
only takes about 5 to 10 minutes if you've filled the tortillas
with warm chicken.


*May add shredded cheese with the chicken filling, but I didn't this time.


**For the Enchilada Sauce you may~


Used a canned commercial enchilada sauce; your favorite brand.

or


Here is a Red Sauce recipe I've shared in the past.

or

My favorite way for sauce
when making this version of enchiladas:

Use some of the broth from cooking the chicken--
chop a fresh onion, saute in a pan with hot oil until tender,
but not browned. Place the cooked onion in the container of
food processor or blender
add some of the broth from the cooked chicken along with 
some jarred salsa (choose your favorite brand.)
Whiz until smooth, adding chicken broth to make it desired
consistency ~ taste and adjust seasonings.

Tip:

To serve~

You might want to offer the following at the table, for
those who want to make them "supreme":

 grated or crumbled cheese --your favorite kind
sliced or diced avocado --or guacamole
diced/chopped tomatoes
fresh cilantro
sliced green onions
pitted black olives, sliced or halved
sour cream,
salsa or hot sauce 

I hope you enjoy!


A Sampling of my food . . .

Subscribe:

 Subscribe in a reader...or

Enter your email address:

Delivered by FeedBurner