Tuesday

One, Two or Three Mushroom Soup

It's wild mushroom harvesting time in my part of the world, which makes me think of earthy mushroom dishes. Mushroom soup comes to mind immediately.


If fresh, wild mushrooms aren't available you can easily substitute dried mushrooms instead. This way it is a recipe you can make at any time of year.


Oh la la~ heady & decadent. I used the immersion blender to smooth it out, and added a tiny garnish of sour cream blended with a drizzle of white truffle oil.

As with most mushroom soups, it's not beautiful, but what it lacks in beauty is more than compensated by the tremendous flavor payoff.

A very elegant and tasty soup; suitable as a starter for a fine dinner. I would definitely prepare this again, exactly the same way.

Keeper!

One, Two or Three Wild Mushroom Soup
Serves 4

¼ cup minced shallots, scallions, or onions
2 Tablespoons butter
½ pound white mushrooms, cleaned, stemmed, and sliced
½ pound “wild” mushrooms (porcini, morels, shiitake, or, in a pinch, portobello, or a mix), cleaned, woody parts removed, and sliced
OR you can use an additional 1/4 cup dried mushrooms in place of the fresh, wild.
¼ cup dried mushrooms
3 cups chicken stock
¼ cup heavy cream
1 Tablespon fresh tarragon (or chervil, or 1 1/2 teaspoons fresh thyme), chopped
Salt and pepper

Soak the dried mushrooms in ½ cup boiling water for twenty minutes, squeeze as much liquid as you can from the mushrooms, and chop the mushrooms. Reserve the liquid!

Saute the shallots, scallions, or onions in the butter in a large saucepan over low-medium heat until they’re transparent, about three minutes.

Add the sliced white and wild mushrooms, stir to coat with butter, cover, and cook for 5 or 6 minutes until the mushrooms have started to release their liquid.

Add the chicken stock, chopped re-constituted dried mushrooms, and reserved mushroom liquor and simmer, partially covered, until the mushrooms are cooked, about 20 minutes.

Add the heavy cream and tarragon or chervil, bring the soup to the boil, correct the seasoning, and serve.

I followed the method but used only the intensely fragrant and flavorful dried, Morels and Porcinis.

Monday

Postcard ~ From the Garden

One of the reasons I love to garden~
Some of the luscious ones.
(Click to enlarge the photo.)

Make-Ahead Stir Fry Sauce


One of the quickest dinners I can put on the table is an Asian-inspired dish of noodles, vegetables and shrimp, (or cooked chicken, beef or pork ~ of course the meat is optional).


Boxed mixes (consisting of noodles and sauce only) are available for this type of dish, but they are ridiculously expensive for the pennies worth of ingredients in pretty packaging. I much prefer to make my own, knowing exactly what goes into the sauce.


I make this sauce in advance (can store in refrigerator for up to two weeks), or it can be divided into small containers or small plastic 'zipper' bags and stored in the freezer until needed.

It's a good all purpose stir-fry sauce for vegetables and meat, sans the noodles as well.


This time I included with the noodles; shrimp, celery, zuchinni, carrots, scallions and garnished with cilanto, roasted cashews, and toasted sesame seeds, with a drizzle of dark sesame oil.


Make Ahead
STIR - FRY SAUCE

1/2 cup cornstarch
1/4 cup brown sugar
1 Tablespoon minced fresh ginger root (don't use dried or powdered)
2 to 3 large cloves garlic, minced
1/4 to 1/2 teaspoons red pepper flakes (optional)
1/2 cup soy sauce
1/8 to 1/4 cup rice vinegar or cider vinegar
2 cups chicken or beef broth (Swanson is a good brand)
1/2 cup dry sherry; pale dry, or cocktail sherry. NOT cooking sherry, not sweet sherry.
1/4 to 1/2 cup water

Combine first 5 ingredients in a large jar (or in blender container). Add soy sauce and vinegar. Shake or blend until well combined. Add broth, sherry and water. Shake or blend again. Store in refrigerator for up to 2 weeks.


May be frozen.


Note: After you make this you may find you prefer to adjust the seasoning ingredients; for example more garlic, more ginger, sweeter, less sweet, etc.
~~~~~


To make the meal in the photos, I simply cooked the vegetables until crisp tender in the pot of boiling water, and the shrimp until just done. I used a scoop/strainer to retreive the vegetables and the shrimp and set them aside. Using the same pot I boiled the noodles (I used Asian noodles, but you can use spaghetti, linguine, soba noodle, rice noodles, or any you like.) If you have leftover vegetables and meat you can use if you prefer.


When noodles are cooked, drain and return to the same pot noodles were cook in, over medium low heat, add enough sauce to coat the noodles (depending upon the amount of noodles) to your liking. Gently toss and stir, when the sauce begins to thicken, add the vegetables/meat and toss, allowing to heat through until hot. Add more chicken or beef broth if you like saucier noodles. Serve in bowls, garnished* as desired.


* Favored Garnishes:
Roasted nuts; peanuts, cashews, almonds
Toasted Sesame Seeds
Lime wedges
Cilantro Sprigs
Chili oil, or dark sesame oil
Slivered green onions (scallions)

Tiny Tiramisu


With grateful thanks to Donna Hay for the idea ~ There is barely a need for an actual recipe for these, it's simply a matter of assembling.


A few Savoiardis (crisp Italian sponge finger biscuits) broken up, dipped quickly in strong espresso and liquor/liqueur of choice (I used Kahlua), then layered in shot glasses with your usual Tiramisu ingredients, a little mascarpone, the Savoiardis, and uncooked zabaione mixture, ending with mascarpone. Then topped with a dusting of shaved dark chocolate.
All of the flavors, but very little work.


Tiny Tiramisu

How many this will yield will depend upon the size of your individual serving containers (you can make this in tea or coffee cups, or ramekins as well.)

(My wine glasses hold 5-ounces each; which made 4 tiny tiramisu)

1/2 to 3/4 cups espresso
1/8 to 1/4 cup Kahlua
8-12 ladyfingers
3 egg yolks (or the equivalent of pasturized eggs, if salmonella is a concern.)
4 tablespoons sugar
1 teaspoon vanilla extract
3/4 to 1 cup mascarpone cheese
Good quality dark chocolate

In a small bowl, mix espresso and Kahlua. Break each lady finger into 3 or 4 pieces; dip ladyfingers in the liquid, hold for 3 to 5 seconds, (no longer or they will disintegrate) then reserve on a plate.
With an electric mixer, or a whisk, beat egg yolks, sugar and vanilla until ribbons form. Fold in mascarpone. Reserve.

In each of 4 serving containers place 2 or 3 pieces of soaked ladyfingers in the bottom. Drizzle with a little liquor. Then add about 1 to 2 tablespoons of mascarpone mixture (this will depend upon the shape of your serving containers), mine were tall and narrow. Add more soaked broken ladyfingers another drizzle of liquor and another layer of mascarpone. Refrigerate until serving time.


Just before serving grate chocolate over each serving. Stick an additional Savoiardi in each, if desired. Serve with small spoons.

Sunday

100% Whole Wheat Bread ~My Sunday Tradition

A cookbook addict, it's a habit I began nurturing in my early 20's (I'm a lot older than that now), and still the addiction continues. Many cookbooks later, I still find myself going back to some of the original ones I acquired over 30 years ago.

This favored recipe is from one of those; a plain paperbound book, with no photos, just a few pen and ink illustrations. It is the recipes within that make this one a long time favorite.

"The Book of Whole Grains" by a former "San Jose Mercury" newspaper food columnist, educator, and cook book author; Marlene Anne Baumgarner. It's been reprinted and updated since I bought mine back in 1976, but I have never found a whole wheat bread I like better than this one.

Bread baking by hand was my relaxing weekend ritual, making it every Sunday morning, through the years while our son was growing up. It's the bread he was raised on.
I enjoyed every step of making our daily bread, the smell of the butter, honey and molasses melting, the therapy of hand kneading it, waiting for the rise, shaping it into loaves, and the homey, comforting aroma of the vaguely sweet brown bread baking. It was a very satisfying experience.

I was dedicated to feeding my young family well, with wholesome foods. Being on a budget, I made as many things I could from scratch; this was one of our staples; honest, sturdy bread made from good, nutritious ingredients. Over 30 years later, this is still my favorite 100% whole wheat bread.

Though I no longer make this particular bread every week, whenever I do the sensory perceptions take me right back to those Sundays of my weekly breadbaking days.
It is wonderful for sandwiches, and makes the most outstanding toast. If you wrap it well in plastic ( a tightly sealed plastic bag works fine), and keep it in the refrigerator it will keep from one baking Sunday to the next.

I'm happy to share it with you ~

My notes: The only changes I made to the original recipe is to cut the amounts of honey & molasses as I don't care for a sweet bread on a daily basis.
At times I have add sprouted rye, wheat, etc. (about 1/2 cup of either). Also you can subsitute 2 to 3 cups of the flour with rolled oats, or a combination of rolled oats, wheat germ, bran, millet, sunflower seeds or other grains or seeds to equal the amount of whole wheat flour you subtract, to suit your taste.

If you make it, I hope you enjoy it as much as my family has through all of these years. After 30-plus years, I still declare ---It's a keeper!
100% Whole Wheat Bread
Makes 2 standard size loaves
Please see Marlene's notes at the end of the recipe.
3 cups milk or water (water brings out the flavor of the wheat best, but milk makes a more nutritious loaf.)
3 tablespoons oil or margarine (I use butter, or olive oil)
1 tablespoon salt (this seems like a lot, but the bread needs it)
1/2 cup honey (I use a scant 1/4 cup honey)
1/4 cup molasses (I use a scant 1/4 cup molasses)
2 tablespoons active dry yeast
1/4 cup lukewarm water
6-1/2 to 7 cups whole wheat flour (I use stone ground whole wheat)
Combine milk, oil, salt honey and molasses in a saucepan. Heat and stir until blended; remove from heat and cool until lukewarm. Dissolve yeast in 1/4 cup lukewarm water (if you use the cup you used to meaure the honey and molasses, the yeast will bubble faster.)

Pour liquids from saucepan into a large bowl and add yeast. You can use your sturdy stand mixer with the dough hook for mixing from this point on.

Stir in 3 cups of flour, beating well to develop gluten. Stir in remaining flour (and any other grains if you are using them) and turn out onto a well-floured board.
Knead thoroughly, until dough is smooth and elastic.
Turn into an oiled bowl, turning dough once to coat. Cover with damp cloth and allow to rise 1 hour. Punch down, form into two loaves and place into two well greased bread tins; allow to rise, covered for 45 minutes. Bake at 375-degrees (F) for 45 minutes, or until loaves sound hollow when thumped.

Marlene's notes: If, at the end of the week the loaf becomes crumbly, lightly toast the slices before serving. If bread is to be used for sandwiches, be sure not to let it over-rise, or it will have holes in it and will not contain jelly, honey (or spreads.)

And my favorite bit of Marlene's advice about this bread:
"If you start baking bread for your family, be forewarned: they may never accept store-bought, bubble-gum bread again."

I certainly found that to be true with my family. Try it toasted, with Better Butter (recipe in separate post) and you're in for a delicious and fairly healthful treat.


Little Flower Lemon Curd Tartlettes

These petite & pretty tartlettes are simply sweet pastry dough baked off, then filled with lemon curd, and topped with a sweetened whipped cream "kiss". They are perfect as part of a dessert buffet, or as an offering on the sweets tray for an afternoon tea.
If available make the curd with Meyer lemons, the flavor is milder and a little more "fruity". But don't worry if Meyer's are not in season, I've filled them with regular lemon curd and the plate is always cleared.

No last minute rushing to serve these as you can make the lemon curd a day or two in advance, ready to fill the pastry "flowers". On the day you want to serve, simply prepare and bake the pastry shells, allow them to cool and fill with the lemon curd, refrigerate until serving time.

Being from the temperate SF Bay Area, I took homegrown citrus for granted until I moved to this colder climate.

Never fear! If you don't mind overwintering the pot indoors, you can grow Meyer lemons from your own tree as I do, even if your winter temperatures are less than ideal for growing citrus.

Use your favorite Lemon Curd recipe for the filling; here is one of mine:

Lemon Curd
Makes 1 1/2 cups

3 large egg yolks
zest of 1/2 lemon
1/4 cup freshly squeezed lemon juice, (2 or 3 lemons)
6 tablespoons sugar
4 tablespoons unsalted butter, cold and cut into pieces

Directions
Combine yolks, lemon zest, lemon juice, and sugar in a small saucepan. Whisk to combine. Set over medium heat, and stir constantly with a wooden spoon, making sure to stir sides and bottom of pan. Cook until mixture is thick enough to coat back of wooden spoon, 5 to 7 minutes.
Remove saucepan from heat. Add the butter, one piece at a time, stirring with the wooden spoon until consistency is smooth.
Transfer mixture to a medium bowl. Lay a sheet of plastic wrap directly on the surface of the curd to avoid a skin from forming; wrap tightly.

Let cool; refrigerate until firm and chilled, at least 1 hour. Store, refrigerated in an airtight container.


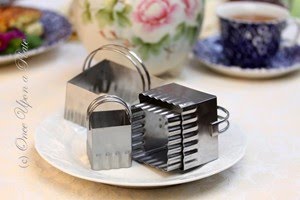
Of course you can fill any shape baked pastry with the lemon curd, but if you want to make the flowers, choose a "daisy" shaped cookie cutter similar to this one:

I baked mine off in a "tart plaque", a specialty pan with very shallow indentations. Prick the dough with a fork before baking to prevent it from puffing up. Also before baking I brushed the surface of the dough with an egg wash for extra sheen. (Not necessary though.)

If you don't have such a pan simply invert a mini-muffin pan and gently shape each dough cut-out over the bottoms of the mini-muffin cups, and bake (with the dough on top of the inverted pan.) You may want to allow space between each piece of dough to avoid crowding, so cover every-other muffin cup with the raw dough.

Just use your favorite pie crust dough recipe, adding a teaspoon of sugar with the flour when mixing, if desired. Cut into flowers or circles, bake off then cool completely before filling with the cold lemon curd.

After filling cover loosely and keep refrigerated until serving time. Top with a bit of slightly sweetened whipped cream just before serving.

Anna Pump's Chicken Frickadellen

(Click on photo to enlarge)

Wonderfully juicy and tender chicken patties, these are delightfully different. As usual Anna's creative take on complimentary sauces makes this recipe a standout. I've added my hints and comments within brackets, below.

Anna's comments about this recipe~

“Translated, frickadellen means “large meatballs, lightly flattened”. We make them in large quantities at Loaves and Fishes. They’re so much in demand because they are juicy and tender, and reheat well. We serve them on a toasted bun with a side of green salad, or as a dinner entree with a side of couscous."

Chicken Frickadellen with Caper and Lemon Topping
Adapted from "Summer on a Plate" by Anna Pump

To make the chicken patties:
2 pounds boneless chicken thighs, skinned, trimmed of fat, and cut into large chunks
1 cup minced onions
1 cup soft fresh bread crumbs
2 large eggs
1 tablespoons fresh lemon juice
1 ½ teaspoons kosher salt
1 teaspoon smoked Spanish paprika
1 teaspoon ground cumin
1/4 teaspoon cayenne pepper

Topping:
3 Tablespoons olive oil
1 cup finely chopped onion
1/3 cup capers in brine, drained
1/4 cup fresh lemon juice
1/4 cup minced fresh parsley

Method:

Place chicken in a food processor fitted with the metal blade. Pulse a few times until coarsely chopped. Transfer chopped meat into a large bowl. Add the onion, bread crumbs, eggs, lemon juice, salt, paprika, cumin and cayenne. With your hands , knead until well combined.
[I just used a silicone spatula and mixed it really, really well.]Shape into 8 patties.

Note:
I used a portion scoop (ice cream scoop) to portion the patties. There is no photo in the book, but Anna must make her patties quite large (approximately the size of a beef burger). I halved the recipe and made 8 patties, I like the smaller size, they are easier to flip and make a pretty presentation on the plate. But for sandwiches, I would make the patties larger, to fit the bun.

To grill:
Brush the grill lightly with oil. Cook the patties over medium-hight heat for 12 minutes, turning them once.

To saute:
Heat 2 tablespoons olive oil in a large skillet. Saute the patties over medium heat for 12 to 14 minutes, turning them once, until cooked.

[These may have a tendancy to brown too quickly (before cooking all the way through) so I sauteed mine, then transfered to a preheated 325* oven for a few minutes to make sure they were cooked through.]

For the topping: (Don't skip! This puts them over-the-top.)
In the olive oil, saute the onion in a skillet over low heat about 8 minutes, until onions are light brown, & glossy. Add the capers and cook 3 minutes, stirring a few times. Add the lemon juice, turn the heat to high and cook 30 seconds. Spoon the topping over the patties and sprinkle with parsley.

Yields 4 servings
This recipe can be doubled.

I served the patties with couscous cooked in chicken broth and topped with toasted pine nuts, and a lemon wedge on the side.

They were so good ~ I look forward to making these again soon.

Saturday

Postcard ~ From the Garden


Sausage-Tomato & Rosemary Sauce for Pasta


A take off on my mom's meat sauce for pasta, this one never fails to satisfy that craving for a comforting pasta dish. It's simple to put together, and only needs to simmer for about 30 to 45 minutes to develop the deep, rich flavor.

1 tablespoon olive oil
1 pound Italian Sausage (mild/sweet, or hot) I buy in in bulk from my butcher, but you can buy in casings and simply remove from casings then proceed with recipe.
1 medium to large onion, diced
1 or 2 cloves garlic, minced or finely grated
1/2 to 1 teaspoon dry fennel seeds (optional, but I always add)
1 tablespoon fresh rosemary, stems removed, leaves chopped
1 scant tablespoon dried basil (plus fresh if you have it on hand)
1 1/2 teaspoon dry oregano (a little more if you like)
1/8 to 1/4 dried chili flakes (optional; add if you like it spicy)
1 to 1/2 teas. fennel seeds (optional, I always add)
1/2 cup dry white or red wine
3 to 4 cans chopped tomatoes (14 ounce, or equivalent)
Salt and freshly ground pepper to taste
Chopped Italian parsley to garnish

Optional garnishes:
Kalamata olive halves,
Sprigs of fresh rosemary

Heat olive oil in a Dutch/French oven or large pot over medium high heat, add meat, stirring occasionally, and breaking up so there are no large chunks. When browned reduce heat to medium, add chopped onion, stirring once in a while until translucent but not brown. Add herbs, stir to combine and release their fragrant oils. Add garlic, stir, then wine, stir bottom of pot to deglaze. Add tomatoes and their juice and stir to combine all.

When mixture reaches a boil, reduce heat to low, simmer, partially cover pot (to reduce stove top clean-up), but don't cover entirely, you want the steam to escape to allow the sauce to reduce, thus concentrating the flavors.

Simmer 30 minutes to 1 hour until as thick as you like, stirring occasionally during that time. Taste for salt & pepper, adjust seasonings.

Skim any fat, and discard. Serve hot with fusilli, conchiglioni (shell), farfalle, or any favorite pasta shape.

Offer freshly grated Parmesano Reggiano cheese at the table for each diner to add as they like.


A Sampling of my food . . .

Subscribe:

 Subscribe in a reader...or

Enter your email address:

Delivered by FeedBurner