Showing posts with label Cheese. Show all posts

Wednesday

Fig-Prosciutto Crostini with Brie, Walnuts & Rosemary


Some of the popular flavors of Fall, all combined into an
easy, tasty appetizer or snack The combination of
sweet and salty is practically irresistible!


If you have fresh figs, you could slice them in place
of the fig jam ~  substitute thin apple slices, or pears
for the sweet base if you like. 


The recipe is really versatile ~ you can substitute any
favorite jam or preserves, a different cheese and
other toasted nuts (or leave them out entirely.)


It's one of those easy recipes that you can put together
on a moments notice for unexpected guests.

I added the prosciutto, toasted walnuts and the 
rosemary needles as a garnish  (after broiling the bread --spread
with the jam and topped with a piece of Brie) ~
but if you want to assemble ahead with no last minute work, 
you could simply layer the toppings on the bread slices and 
bake in a hot oven until the jam is bubbling and the cheese is melted. 
The prosciutto becomes a little crisp, 
and the rosemary takes on a delicate, toasty crunch.

Cut the bread about 1/2-inch thick, then add the toppings. The texture is
best if you do not toast it first ~ just add the toppings and broil until the
jam is heated and the cheese is melted.


No need for an actual recipe, this one is
particularly easy to remember.

Other suggestions you might like:
Apricot, Raspberry, Peach jam, or a smear of honey; 
 other toasted pine nuts~ 
pecans, sliced (or chopped) almonds, or macadamia nuts.
Goat cheese, cream cheese, Gorgonzola or Blue, etc. ~

There are all kinds of possibilities . . .


Instead of serving as an appetizer or
snack,  substitute them for the cheese course after a special dinner.


Mix it up and try this idea with your own favorite toppings ~ 
I believe you'll enjoy.   


Thank you for stopping by
today, friends!


xo~Mari   :)


Tuesday

Smoky Cheddar Spritz Crackers


As we were growing up our mother would make Spritz Butter Cookies 
almost every year during the holidays, and also cheese 'straws'
throughout the year.  Maybe your mom or grandmother did as well?


My sister and I followed the same tradition as we started our own
families, we would decorate the cookies in all sorts of pretty ways 
and sometimes with colored cookie dough ~ 
They are a perpetual favorite and always look
so festive on the cookie tray.


Sadly, my cookie press finally went kaput after many
years of use, so when I saw good reviews about this set
made by OXO I was compelled to replace my old Mirro
metal version.  Plus, I fell for the pumpkin disk in
the Autumn set. :)

OXO's great reputation and all of the unique disk motifs, 
its' ease of use and care sold me. 


The press comes with 12 decorative disks; all of the traditional
ones I remember -

snowflake, heart, wreath, tree, buttercup, daisy, etc.
as well as some, new to me (all really cute!) :

shell, sunflower, fleur de lis, bear (little teddy bear!), leaf, butterfly

See more about the press and other disks below.


~*~*~*~*~


Of course you can use any cookie press or disk to make these
delicious cheese straw crackers, follow your favorite recipe or
choose the one I favor (it's over on my recipe blog, link below.)

This is my favorite recipe for a savory cracker using
the cookie press.

Like most all Spritz-type cookies the recipe is really simple, 
just a bit more involved than a shortbread dough.  

But for the cheese crackers I jazz mine up a little
by adding 1/4 teaspoon dry mustard powder and 1/4 teaspoon
Turmeric (it adds a very subtle warm flavor and nice color.)

Sometimes I mix it up by using Smoked Paprika (as I did this time)
instead of plain sweet paprika.  If you like them spicier, increase the
amount of cayenne pepper, or hot paprika.


Tip for crispy crackers:

I like these crackers to be crisp, but not brown,
so after baking and cooling all of the batches, 
I place them in a single layer on the baking sheets
and place in a 175ºF oven for a several minutes until they dry out a little,
they will crisp even further after cooling. Keep an eye on
them while they're in the oven so they don't turn dark. 

Alternately you can place in your oven set to 'warm', 
or the lowest temperature available and do the same.  

Either way you choose, do watch them as ovens vary.

When the crackers are crisp, I turn off the oven and leave
the oven door open just a bit until the crackers are completely cool,
then store in airtight containers for up to a week or so.

These are really good served on the cheese/fruit tray or along with
soup or a salad. They make a nice gift from the kitchen, too.

If you give them a try, I hope you enjoy!

A printable version of the recipe and tips can be found on
my recipe blog by clicking this link.


~*~*~*~*~

Additional Disks for the OXO Cookie Press

Also available separately are two sets of additional seasonal disks,
(six disks in each set):  

OXO Good Grips Cookie Press ~ Autumn or Springtime ~ Disk Sets

The Autumn set includes: 
Spider, Web, Owl, Turkey, Leaf and Pumpkin

The Springtime set includes:
Cherry Blossom, Rose, Love, Double Heart, Shamrock, Bouquet


(You can click the link above to learn more)


Thanks for coming by today, friends.

Bon Appetit!

~m.


Note:  The folks at OXO don't know who I am, (no compensation from them.)
I'm just sharing a product I like... I hope you like it, too.  :o)


Monday

Spooky Eye-Popping Soup for Halloween


I saw this presentation on Home is Where the Boat is, 
a wonderfully creative blog by my friend Mary.  
If you're not familiar with Mary's blog I urge
you to go visit, you're in for a treat!


For the Spooky Eye-Popping Soup I made a recipe similar to this one; 
I used half lean ground beef and half Italian sausage, 
fusilli instead of tortellini, omitted basil leaves ~ 
I used a couple of pinches of dried oregano instead, 
and chopped the vegetables into small dice just so the 'eyes' 
would get most of the attention.  


If you would like an even simpler soup you may like this one, 
directions for making the eyeballs can be found here as well. 
I simply used bite size mozzarella (bocconcini) and placed 
thin slices of stuffed green olives on them to resemble 
pupils and irises. 


It's a fun and flavorful soup to help get everyone in the mood for Halloween.


Thank you for stopping by today friends ~
Have a BOO-tiful week!  :)

~mari xo

Tuesday

Crispy Herbed Chevre with Heirloom Tomatoes ~ PLUS Easy Herb Batter Bread


We're getting down to the nitty gritty; the very last of the
tomato season here. After this it will be the hothouse
variety until next season.


I like to treasure these last few colorful remnants of summer in
the most simple way, to let their natural sweetness shine.


This presentation is similar to what Chef Jonathan Waxman introduced
way, way back at the beginning of California Cuisine, in the 1970's.  
Long before PCs were a household commodity I remember 
clipping newspaper and magazine recipes which featured 
this exciting nouveau style of preparing food ~ 
I think most of us "of a certain age" did the same. 


Practically unheard of here prior to that time, 
fresh goat cheese became all the rage, thanks to 
Laura Chenel in Sebastopol, CA. 
She was  America's first commercial producer 
of goat cheese in the US. 
 
 I remember meeting Laura around 1980 as she introduced her 
newly published cookbook (featuring, of course, goat cheese) 
at one of the first Williams-Sonoma stores to branch off from the 
original store in nearby Sonoma, California.

Those were exciting times ~ though we now take the 
concept of California Cuisine rather casually, it is important to 
remember that it was the start of a food revolution, 
heavily influencing the way we eat today.


I love the colors of a mix of tomatoes! But any kind of fresh,
ripe tomatoes you have will do, slice the larger ones and just
half the cherry or pear tomatoes.


Fresh and vibrant, this salad exemplifies the roots of
California Cuisine.  Chef Jonathan's method is very simple; get the
ripest, most flavorful tomatoes adorn them simply with
salt and pepper, lemon juice and your favorite nut oil,
such as walnut, hazelnut, etc.

Blend a couple of teaspoons or more of freshly minced herbs into
the goat cheese very well,  then form the herb cheese into patties 
(about 2 ounces each), one per each serving.  
Dip in beaten egg and then in plain breadcrumbs
which have been seasoned with salt and pepper. 
(You can use Panko crumbs if you like.)

Chill the patties or at least 1/2 hour in the refrigerator, 
(they will hold together during cooking a little  better if you chill 
them even longer.) 
 
When thoroughly chilled bake them on a buttered baking sheet 
@ 375ºF for about 8 minutes, or brown them in a little oil 
in a frying pan over medium high heat for a few minutes 
on each side, turning once, until they are nicely golden brown.

Place on plates or a platter, arrange the tomatoes around
the patties, sprinkle with herbs of your choice, salt and freshly
ground black pepper. Squeeze lemon juice or a little of your
favorite vinegar over and drizzle with nut oil sparingly.

Serve and enjoy while the cheese is still warm.


~*~*~*~*

Fast and Easy Herb Batter Bread

As an accompaniment I baked up some Herb Batter Bread,
it's from Sunset Magazine from about the same era.

It's a really easy yeast bread, so if you've ever felt intimidated
by yeast breads ~ try this one, it's practically fail proof!

 It goes really well with soups or salads, and any other simple meal. 


 I cannot count the number of times I've made this bread, 
but you can probably guess by the condition of my
1971 edition of the Sunset book. (It cost a whopping $1.95 then.)

Back then fresh artisan bread wasn't readily available as it
is today and homemade bread like this was a treat.

  You can mix it all up in your stand mixer, or by hand it is not
difficult and there is no kneading required.


I usually would bake the bread batter in a round cake pan, but this time 
I baked it off in a little rectangular pan. (About 6.5-inches x 10-inches)

I substituted about 80% of the all-purpose white flour with whole wheat flour.

It goes together quickly and is a fantastic recipe to have baking
when your loved ones or guests arrive at your home. The
aroma is so enticing!

Although we didn't know it then, 
the batter is very similar to a foccacia dough 
(which I didn't even know about years later.)

When it comes out of the oven the top is brushed with melted butter
and sprinkled with a little coarse salt to heighten the flavor of the herbs.


You can use any herbs you like, fresh or dried. In addition to the
herbs I usually always add some minced dehydrated onion to the batter.

A little butter melting on the baked, warm bread, and you just about
have heaven on a plate!  


It makes a really good little luncheon dish, or light supper,
and brings back a flood of memories of my early cooking
days.


~*~*~*~*~


If you try either or both of these, I hope you'll love them!

If you would like a printable copy of the Herb Batter Bread,
hop on over to my recipe blog ~ HERE.


Thank you for coming by today, I really appreciate
your comments. 

See you next time~ 
~Mari  :)

Wednesday

Cheesy "Pizza" Broccoli


I didn't want to serve the same ol' steamed, or stir-fried broccoli,
then I remembered a recipe similar to this one, by Daphe Oz
(Dr. Oz's daughter), from her lifestyle/cooking book
"Relish"

Click image to learn more about the book.
It's a perfect choice for college students, young singles and
newlyweds. I'm none of those and I like it too. :)


Daphne's version is even more simple than the one I devised
(no roasted tomatoes/garlic/red onions or mozzarella in her version) 
but this one is a lot more flavorful, in my opinion.


By now, if you've been reading my blog for any
length of time, you know that I love cooking intuitively ~
that is with a basic recipe in my head, and then letting
the creative juices flow!  This is another one of those,
and you can adjust it to suit your own taste.


Easy and flavorful, here's what you'll need for
the basic recipe:

Cherry or Roma Tomatoes
Salt, Freshly ground black pepper
Olive oil (or oil of your choice)

Dried oregano leaves
1 or 2 cloves garlic, thinly sliced
Red pepper flakes
Half an onion, slivered
Fresh Broccoli Spears
Grated Mozzarella Cheese
Freshly grated Parmesan Cheese

Optional:
Lemon wedges
Fresh oregano or basil leaves
(Extras ~ see below)

Method:

Place rack in center of oven, preheat to 400ºF.

Wash and cut in half a couple of handfuls of
cherry tomatoes, or as many as you want to make a single layer~
 (you can use quartered Roma tomatoes or a similar variety; 
tomatoes that are not too juicy work best in this recipe.)
In a shallow baking dish toss them with some olive oil, sea salt and 
a little freshly ground black pepper.

Place pan in oven and roast tomatoes for 10 to 12 minutes
(make take longer, depending upon your oven and the baking dish
you are using.) Scatter 1 or 2 sliced garlic cloves, half of a slivered
onion (white, yellow, red/purple), a couple of generous pinches
of dried oregano, and a couple of pinches of 
red pepper flakes (optional), give a stir to coat with oil and
continue roasting for 10 to 12 minutes ~ it's okay if some tomatoes
begin to char.

While tomatoes are roasting, steam broccoli spears until just
crisp tender. Remove tomato pan from oven, arrange broccoli
over tomatoes, add a little s & p if desired, 
sprinkle with grated mozzarella cheese (as much or as little as you like), 
sprinkle with grated parmesan cheese and place back in oven, or under hot
broiler until cheese is melted and begins to bubble. 
Remove from oven allow to cool for a moment, sprinkle with a few 
fresh oregano or basil leaves.
Serve with lemon wedges if desired.


Add any of these optional ingredients if you like:
(to be added during second half of roasting tomatoes, or
upon serving, as garnish):

sliced or halved flavorful black olives
roasted red pepper slivers or pieces
marinated mushrooms
sliced green onions (scallions)
cured anchovy fillets
marinated artichoke hearts
cooked Italian sausage crumbles,
torn prosciutto, etc. 
 ~ almost anything goes!


Colorful and tasty, it makes a fine main course
or a great side dish for simply prepared meat, poultry or fish.

Gluten-Free and Vegetarian friendly, too.


Bon Appétit! And thank you for visiting today!


xo~mari


Monday

Caprese Salad to go . . .


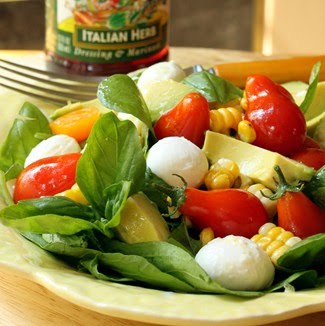
To me, the flavors and colors of Salad Caprese are the essence of 
summer  ~ Vine ripened tomatoes, fresh Mozzarella
cheese, fresh basil, red wine vinegar, good olive oil
and salt and freshly ground black pepper.

Usually it is neatly arranged either stacked,
or in fanned layers of sliced tomatoes and slices
of Mozzarella, then drizzled with dressing and
showered with chopped basil leaves.

It's a beautiful presentation when served that way, 
but a little fussy to serve on a picnic or on the buffet table.
I've made it served on skewers, but that is
a little time consuming especially if you have
to make many of them.


This version has all of the glorious flavors,
and is easy to serve on the buffet table
plus it travels well.

Just halve the little tomatoes, cut the Mozzarella
into cubes, or buy the little "pearl" size as I did.
Add some minced parsley, the red wine vinegar and
olive oil and salt and pepper to taste.

This time I added some capers in brine (drained).
Sliced scallions, chives or slivers of sweet red onion
are also a good addition.

I pluck the smallest basil leaves and add them
just before serving in order to retain their bright
color and flavor.


It's best served at room temperature to
enjoy the full goodness of all the flavors.


~*~*~*~*~
Additional ways to enjoy it:
Bobby Flay does a very similar version which
he serves as a rough 'relish' with grilled
Italian sausages on rolls.  I probably would
cut the tomatoes and cheese into smaller pieces in
that case, for easier eating, but I'm sure these
flavors would taste delicious on grilled sausage or chicken.

If you give it a try, I hope you love it.


Thank you for coming by today!

Cheers ~ mari xo 

Bismarck Pizza (with no knead dough crust)

When you raise chickens, it's a given that you'll
search for ways to use their fresh eggs, and this
is one way that we accomplish that.


There is an authentic Italian pizza that is similar to
this one ~ and a knock off here in the states
that is named The Bismarck (I'm not sure
where that name originated), but I just call it
that pizza with an egg on top. :o)


This time I used the "Artisan Bread in 5-minutes a Day"
olive-oil dough for the crust (it's a no knead crust.)
You can find the recipe here. But you can use any
favorite dough for the crust.


Aside from the egg, the other ingredients that sets this apart from any
other pizza I've made (or have eaten), this one includes
salt and pepper on the pizza dough, topped with homemade
garlic butter ~ those two ingredients really add a nice
flavor punch.


I baked these on a preheated pizza stone on the outdoor gas grill,
but you can also bake them in the oven on your pizza stone.


If someone you know is allergic to eggs, you can just omit ~
but I hope you will try the technique of sprinkling salt and
freshly ground pepper on the crust, and definitely try
the garlic butter method!


For additional details and the printable recipe
you'll find it here on my recipe blog.
Have a wonderful day everyone!
xo~mari

A Sampling of my food . . .

Subscribe:

 Subscribe in a reader...or

Enter your email address:

Delivered by FeedBurner