Showing posts with label Handpainted Cookies. Show all posts

Monday

Rainy Day Hand Painted Cookies


I've posted about handpainted cookies several times before, but I hadn't made them for quite a while.
It's a fun activity ...


I've been making them for years and years, just for fun. I love the creative outlet and the fact that there are no rules ~ just let your imagination guide you. :D


I don't plan what I'm going to paint, but I usually choose cookie cutters that have something to do with the season, or the event; birthdays, holidays, baby showers, etc.


The dough is just a simple roll & cut-out sugar cookie recipe. After they are cool dip or paint them with Royal Icing and allow to dry.


This time I used a different Royal Icing (which I wasn't very pleased with), it doesn't have the semi-gloss sheen that traditional Royal Icing does. You can see the difference if you compare these to other cookies I've shared before. (Links below.)


When I first began making these I used raw egg whites for the Royal Icing (I told you it was YEARS ago.) :)
But now I always use canned powder egg whites, also called powdered meringue. You can find it in most grocery stores on the baking aisle. Wilton makes a version, too.


The "paint" is simply food coloring; any kind ~ liquid or gel and applied with an artists paint brush. Dilute the food coloring with water to adjust the intensity of the shade your want. For the fine details you can use food-safe decorating pens, available in some craft stores in the cake/cookie accessory aisle or from baking supply stores on the internet.


If you think you might like to make these, I really encourage you to try them ~ they are fun to make.


Here are some examples of some that I have shared in the past:


Thank you for stopping by today for a visit!
I hope you have a wonderful week.


Sunday

Edible Handpainted Cookies ~ Part Three


Photobucket

These are always so much fun to make ~ I just did a few for my party yesterday. Since it was a "Bird" theme, I chose the birdhouse cookie cutter shapes and went with a "semi" winter theme.


Photobucket


You do not have to be an artist to paint these, or plan them out ahead. I usually just think of a general theme, occasion, or season and go from there.


Photobucket


Whimsical ~


Photobucket


Fantasy ~


Photobucket


or


Photobucket


Traditional colors of the season.


Photobucket


Really, anything goes.


Photobucket


I've made these for many years and have always used ordinary liquid food color but this time I also experimented with the gel food coloring (in the baking/cake decorating section of the grocery store), and it works great especially for deeper color saturation.


Photobucket


This time I also experimented with applying detail using food color pens, like THESE to add more detail; they work pretty well.

Photobucket


Note: You can click HERE and HERE for my previous posts about handpainted cookies to get the recipe and to see the other cookies.


Photobucket


They really are a lot of fun to play around with, and are completely edible.


Wednesday

Hand Painted Cookies ~ Part 2

My message board buddies have already seen these. so they are nothing new for many.
Waving "Hello" to my current message board pals and new friends, too.
Thank you for following along, particularly to those of you who leave comments and emails~
they are always welcome!

It may take a bit, but I try to answer each of your comments.
And of course I'll always answer emails, usually within 24 hours. :)


I'm cleaning out some of the Spring & Summer photos to make room for Autumn so
I'm parking them here. :) I hope you enjoy.

(Click on any of the photos to enlarge.)


They really are enjoyable to make, and not difficult as there are no rules, just let your imagination (or the shape of the cookie cutter) guide you.


I usually pick a theme and just go from there, this time it was Spring & Summer.


With a decided G*A*R*D*E*N theme.


It's a terrific way to spend some time on a rainy day.
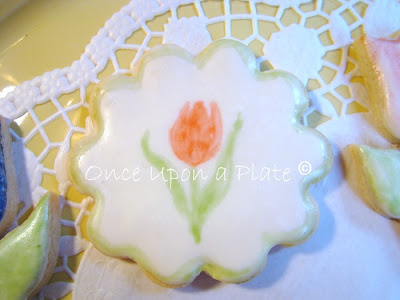


If you would like to have the recipe and find out about the technique,

they are listed in an earlier post; here's the link:

Friday

Hand Painted Cookies

I first made this recipe when my (now grown) son was a young boy, I loved to see his eyes light up when he arrived home from school to see them displayed on racks on the kitchen table.

They are fun to create; it's a chance to let your creativity flow, and everyone seems to love them. They are completely edible, here are some I made earlier this spring.


These are just simple sugar cookies, dipped in Royal Icing, allowed to dry then painted with a water-color paint brush and ordinary liquid food colors.

I don't plan, I just paint whatever comes into my mind at the time at the time, usually with a seasonal theme.


Here' is the sugar cookie recipe that I use for these ~ from an old Sunset Magazine:


Favorite Cut-Out Sugar Cookie
Makes about 45 2 1/2-inch cookies
I roll the dough thicker; thus the dough produces fewer cookies

Ingredients:

1 cup (1/2 lb.) butter, at room temperature
1/2 cup sugar
2 large egg yolks
1 teaspoon vanilla
2 1/2 cups all-purpose flour


Preparation

1. In a bowl, with an electric mixer on medium speed, beat butter and sugar until smooth. Beat in egg yolks and vanilla. Stir or beat in flour until well blended.

2. Divide dough in half. Flatten each portion into a 1-inch-thick disk. On a lightly floured board, with a floured rolling pin, roll dough, a portion at a time, to 1/8 inch thick.

3. With floured cookie cutters, cut dough into shapes (if dough is too soft to handle, freeze briefly until firm).

4. With a wide spatula or your fingers, transfer cookies to buttered or cooking parchment-lined 12- by 15-inch baking sheets, spacing them about 1 inch apart. Gather scraps, pat into a ball, and repeat rolling and cutting.

5. Bake cookies in a 300° (F) oven until golden, about 15 minutes; switch pan positions halfway through baking.

6. With a wide spatula, transfer cookies to racks to cool. If hot cookies start to break, slide a thin spatula under them to release; let stand on sheets to firm up, about 5 minutes, then transfer to racks to cool completely.


Recipe from "Sunset" Magazine


* These are best made a bit thicker, not thinner & are easier to grasp to dip in the icing that way.


Honestly, sometimes I like my blotting towel more than my painting! It's like that feeling you get when you dump all the Easter egg coloring dye colors in the sink.

A Sampling of my food . . .

Subscribe:

 Subscribe in a reader...or

Enter your email address:

Delivered by FeedBurner