Wednesday

GIVE AWAY!! Grilled/Roasted Veggie & Pasta Salad PLUS a Delicious Give Away!


A GIVEAWAY!

Recently I was given a very nice kitchen gift set from the Marzetti Company, including 4 bottles of Girard's new, improved salad dressings and was asked to blog about them.  


Sept 6, 2011... I must make a correction, some of Girard's Dressings are Kosher, but not all. Please check the labels. My error for misreading the information on Girard's website.

The good news is that one of my readers will have a chance to win a gift box of four full size (12 ounce) bottles of the same dressings I received:


Light Champagne Dressing
Greek Feta Vinaigrette
Olde Venice Italian Dressing
White Balsamic Vinaigrette


~ Please read further for contest details ~


If you're a regular reader, you probably know that I usually make my dressings from scratch, but when I do purchase a bottled dressing I always reach for a premium dressing like Girard's. Excellent quality, created in San Francisco in 1939, and all of Girard's dressings are Gluten Free and some are also Kosher.


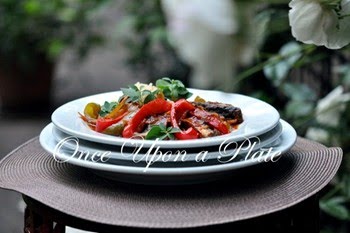
First I made this roasted veggie and gemelli pasta salad tossed with the Greek Feta Vinaigrette

For the vegetables, I chose a couple of things which are abundant in the garden right now: zucchini and red bell peppers, I added slivered red onion and roasted those off for a few minutes in a hot (400˚F) oven. For this recipe I didn't roast them to the point of caramelization ~ I wanted them to remain vibrant and not mushy.

I cooked the pasta, drained and rinsed it in a colander under cold water, added the cooled vegetables, some kalamata olive halves, minced parsley, then drizzled the Girard's dressing over then tossed it well to coat all of the ingredients.  I had a little locally produced feta in the fridge so I added a few crumbles as a finishing touch. It makes a great light dinner (or lunch) on a hot summer day.

Although it's perfect for summer served at room temperature, this would also be delicious served warm, just drizzle the dressing over the hot pasta and warm roasted vegetables, add the olives and parsley and toss.


~ Next, I used the Olde Venice Italian Vinaigrette ~


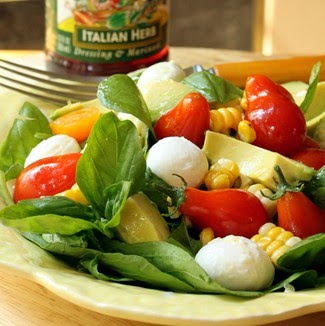
To go along with dinner last night I sliced tomatoes from the garden and drizzled with Olde Venice Italian Vinaigrette, then sprinkled with herbs.


So simple, and so good, the dressing is well balanced so it enhances the sweet summer tomatoes, but doesn't overpower.


I love tomatoes still warm from the sun and straight from the garden ~ but when tomatoes aren't in season, this dressing would be really good drizzled over oven-roasted tomatoes as well.


~~~~~~<><<>><>~~~~~~


I haven't tried all four dressings yet, but I look forward to trying the new Light Champagne Dressing and the White Balsamic Vinaigrette.


Did you know?


With the addition of the 3 new dressings and the Light Champagne Vinaigrette ~ that brings the number of dressings Girard's offers up to an astounding 17 different flavors. There is something for every taste, and the creative possibilities are seemingly endless, (not just for lettuce.)


~~~~~~<><<>><>~~~~~~


The Drawing!

To enter the drawing for the gift box of four bottles of dressing: 

1. Click the link below to go to the Everyday Elegance website, look it over and pick a favorite recipe/idea that looks good to you.

2. Then come on back to my blog and leave a comment about which recipe/idea looks appealing  and I'll enter your name in my drawing:


 (Plus, there is a coupon on the site for $1. off your next bottle of Girard's)

3. BONUS!!! Double your chance to win ~ 

If you are a follower of my blog (sidebar, upper right corner), or if you become a new follower, mention it in your comment and I'll enter your name twice. (No need to leave two separate comments.)

>>Contest closes @ 9PM (Pacific) September 8th.<<

 ** Winner will be announced Friday, September 9th, 2011. **


Note:  If you don't have a blog, just enter your comment and check back on Friday September 9th. If your name has been drawn, send me an email with your mailing address.


----> Sorry, due to contest rules the drawing is only open to the continental US.


 ~ ~ Good luck to all who enter! ~~


This is my entry for Foodie Friday @ Designs by Gollum 


Monday

Savory Palmiers ~ with Chèvre, Sun Dried Tomatoes and Pesto


Very recently a long-time internet friend Becky Shauberger Turner aka "DecoLady" passed at much too young an age. She leaves behind her beloved husband and two daughters, one just married in June and the other starting University this semester, family and friends who will miss her tremendously.

Our paths crossed almost 10 years ago on the old "Food Network" message boards. When that board closed we moved on to other "foodie" boards, and then graduated to blogland and facebook where we continued to remain in touch.

Today is the anniversary of her birth, her friends and those of us who were her cyber-friends are paying tribute to Becky on facebook.  In her honor we are each posting something that reminds us of her.   

A remarkable woman; wife, mother, daughter, sister and friend to many, she had a great lust for life and many varied interests . . . family, cooking, traveling, photography, exotic birds, plants, a love of things from the mid-century (last century), collecting dishes, particularly vintage Fiestaware, music, history, the color red, driving with her car's top down, Ina Garten ~The Barefoot Contessa . . . and so much more.


This is a recipe (from Ina Garten ~The Barefoot Contessa) of which Becky was fond and made while a member of Barefoot Bloggers*  

This just reminds me of Becky ~ bright, unusual, interesting, colorful, and comprised of many layers.


 While the dishes in the photos are not Fiestaware, to me they capture the tone that Fiestaware evokes.  Of course, I had to include Becky's favorite color, red ~ and a couple of glasses of Prosecco another of her favorites, for toasting.

* (Barefoot Bloggers - a group of bloggers who gathered to make Barefoot Contessa recipes.) 


So here's to you, special Becky ~ sadly, there will never be another like you, dear. You're sorely missed by so many.  

Gone from our sight but not from our hearts or memories. 

~Namaste~

~*~*~*~*~

For those of my readers who are interested in the recipe for the savory palmiers, you can find the recipe HERE  and you might find THIS four minute video clip, from YouTube featuring Ina Garten, helpful.

Thank you for stopping by today, friends.  xo ~m.


Sunday

Korean Vegetable Pancakes (Pajeon)


A few days ago (see previous post) when I made the Pork Bulgogi I made these Pajeon [Korean Vegetable Pancakes] to complete the meal.


Sorry if there is any confusion with the name of the recipe ~ there are numerous ways of spelling Pajeon, Pa Jun, Pa Jon, P'ajon, etc.  I spelled it the way I've seen it most often, if you know the correct way, I would appreciate your advice! 


"Pa" is the word for green onion/scallion in the Korean language, so if you're going to include 'Pa' in the name of the recipe, be sure to include the scallions. ;)


Very much like many pancake recipes, the batter is made with flour, eggs, water and a little oil. Lots of slivered scallions, and most anything else you would like to add are stirred into the batter, they they are fried in a little vegetable oil into 8 or 9-inch pancakes. (A non-stick skillet is very helpful when making them.)


Besides the scallions I also added grated carrot, chives, and julienned summer squash (yellow crook neck this time.)  Small pieces of fish or shellfish may be added along with the vegetables, almost anything goes.


The simple dipping sauce is  made from soy sauce, a tiny bit of sugar, rice vinegar, hot chili oil and minced garlic ~ it's very tasty and complements the mild pancake slices perfectly.


Great warm or at room temperature I've served these as an appetizer, side dish and even a light main dish along with soup or salad for lunch or dinner.
They are a favorite at our house, and if you try them I hope you love them too.

Mark Bittman has a good instructional video on the NY Times website, which might be helpful if you've never made these before.

You can find a printable version of the recipes I used for the pancakes and dipping sauce over on my recipe blog by clicking HERE.


Thanks for stopping by for a visit, I would love if you would leave me a comment so I know you've been by today. I hope you all have a safe and happy new week!  


Blessings, ~m.


Monday

Korean-Style Grilled Pork (Daeji Bulgogi)


Yum! But first a disclaimer :)  ~ 

As far as I know, I don't possess a drop of Korean blood in my body and I am no expert on preparing Korean cuisine . . . but that doesn't stop me from enjoying it, and attempting to make it at home.  Particularly Korean BBQ (it's actually grilled, even though it is called BBQ.)

For this version I scouted around the internet and combined a few recipes that I came across.  It was a huge success at my house, and I was pleased with the outcome.


Gochujang

I discovered a key ingredient, a mystery to me prior to this time.  It's called gochujang; a fermented red pepper paste.  Vaguely sweet, with just a bit of a spicy "bite".  The paste comes in different levels of 'heat',  the one I chose is level 3 - medium hot. I don't like the feeling of my mouth on fire, and this intensity was perfect for me ~ 
 Mr. OUaP doesn't like much heat at all, he had nothing but compliments.  

You can find this at any well stocked Asian/Korean market ~ but I couldn't source any locally.  


However, amazon.com came through again!  Here's the one I ordered:


If you happen to like your dishes more spicy, I would recommend you use this one and simply add more red pepper flakes to increase the heat to your liking.  

And gochujang is not just for Korean food, you can stir a spoonful or two into regular American style BBQ sauce,  Pasta sauce, swirl a little on pizza, or anytime you want to add a bit of interesting heat to a dish.


Pork Tenderloin (cut into 1/8-inch slices)

I put the 1 pound pork tenderloin in the freezer for about an hour, after it firmed up, I sliced it into 1/8-inch slices. Then marinated it for 3 to 24 hours (you can marinate it for as little as 1 hour, but I recommend at least 3 if possible.)  

Tip: It's best to use natural pork (the kind without the water and salt solution added).  I always double check the label for ingredients ~ I really don't care for the kind with salt & water added as I like to control the sodium content myself.


In the marinade for 3 to 24 hours.

I actually marinated it in a resealable plastic freezer bag, this is what it looked like before I put it in the bag and refrigerated it.

The marinade consists of soy sauce, minced garlic a little brown sugar, mirin (or sherry), the gochujang, dark sesame oil, fresh ginger root, red pepper flakes (you can increase or decrease the amount of red pepper flakes to your taste ~ I used a very scant 1/2 teaspoonful, though many recipes call for 1 teaspoon or more.), a couple of green onions, minced, and an onion, thinly sliced.


The meat pieces are grilled over a charcoal (or gas) grill, for only a minute per side.  You can serve the Bulgogi with rice, or wrapped in a lettuce leaf with some kimchi (spicy fermented cabbage), and some quick pickled vegetables. 


I made the quick pickles with carrots, radishes, daikon radish, and a hot house (or English) cucumber, and a serrano chile for a little heat.  It only takes a few minutes to put these together, and they store well in the fridge for a few days  ~ a refreshing condiment to go along with the pork.

We liked this so much, it's coming up on the menu again this week. Yay, success!

If you would like a printable copy of the recipes for the pork marinade, and for the quick and easy veggie pickles, you'll find them on my recipe blog ~ here's the link.

Thanks for stopping by to visit!


Friday

Summer Squash Gratin with Salsa Verde


If you've run out of ideas for serving summer squash, you might like to try this recipe.  Adapted from "Sunday Suppers a Lucques" by Suzanne Goin, this gratin is a little more flavorful than most as the squash is tossed in a flavorful Salsa Verde, then combined with shredded Gruyere or Jarlsberg cheese, and some brown-butter fresh breadcrumbs.


Ingredients for the salsa ~ Parsley, oregano, garlic, capers, lemon juice, an anchovy and olive oil and salt and pepper.  


You can make the salsa in a food processor, but I like to use a mortar and pestle for the deepest flavor ~ the ingredients are not just chopped up, they are pounded and ground up which releases their maximum flavor and aroma.


The finished salsa.

The recipe for 2 pounds of summer squash calls for only 1/2 cup of the sauce but it is delicious drizzled over grilled chicken or fish. (For dinner the next night I stirred in some coarsely chopped canned artichoke hearts and a few more squirts of fresh lemon juice,  it was perfect spooned over the grilled salmon.) 


After the squash has been sliced, salted and allowed to rest for several minutes it will give up some moisture.  (I used a combination of crookneck and patty pan squash this time.) Then it is tossed with the salsa verde, cheese and some of the brown butter breadcrumbs and one finely minced Serrano chile (or hot chile of your choice) ~ don't worry it doesn't make the gratin spicy, just a nuance of a flavor kick.

 Into a shallow baking dish (either one large baking dish, or individual serving baking dishes.) 


Since this was a dinner for adults, with no kids around, I used some of my small cast iron skillets; but caution ~ you must warn everyone the skillets are HOT. 

Note: When I serve in the skillets this way I always tie a cloth napkin securely around each handle before serving as a reminder to everyone not to touch the handle directly.


I like the technique of simply salting the sliced squash, (rather than grilling or steaming the slices before assembly) as the squash doesn't become overcooked or soggy.  It is substantial enough to be served as the main entree, and it also makes a good side dish for grilled foods.  

I love the flavor the salsa and brown butter crumbs add to the dish, ~ soo good!

If you would like a printable copy of the recipe click HERE to access my recipe blog.


Thanks so much for taking the time to stop by today ~ I love to hear to hear from you.  Have a wonderful weekend everyone!

This is my entry for Foodie Friday, hosted by Designs by Gollum ~ please stop by to see what else is cooking this Friday.


Tuesday

Fresh Cherry Jam Tartlets


Cherry season is winding down here, and I'll miss the fresh ones until they make their appearance again next summer. Bing cherries are my favorite ~ we had a tree in our backyard while growing up, I loved to pick and eat them, juicy and sweet, warmed by the sun. Unfortunately, the birds liked them too, and often would get the reddest and most ripe ones before we could, much to my Dad's dismay!


Our Saturday Farmers Market had exceptional Bings this year, grown about an hour away from town. I purchased a lot over a couple of weeks and we enjoyed our fill of them fresh right from the stem. I also made a couple of batches of jam, and with the few remaining I made these little tartlets.

The tedious thing about cooking or baking with cherries is the task of pitting them. You can cut the pits out with a paring knife (messy and time consuming), or use one of the several types of cherry pitters available.


The homemade Bing Cherry Jam, and some of those beautiful, juicy cherries.  I love summer!


This style of pitter is my favorite; I've had it for several years ~ it's made in Italy, very nicely designed, comfortable to use and sturdy. It does a neat job of pitting a basket of cherries in a relatively short amount of time.


When cherries are in season I love to add them (pitted of course), to a fresh fruit salad ~ everybody is always surprised that I took the time to pit them (when in fact, it takes barely any time at all.)


The pits usually pop right out on the first try, and the device doesn't smash the cherries (and most of the time the stems stay intact, too; fun for fancy desserts, chocolate dipped cherries, etc.)

I always count the pits and cherries as I work, to make sure the numbers match, to assure that EVERY cherry has been pitted. It doesn't happen very often, but every once in a while a pit remains in the cherry ~ not fun to bite down on a pit.


For the cherry tartlets, you truly don't need a recipe ~ just line each cup in a tart pan with your favorite pastry dough (I cut the dough with a round cookie cutter to make the job go more quickly), then place a scant teaspoon of cherry jam in each pastry cup, and top with half of a pitted cherry (skin side up.) I top each cherry with another 1/4 teaspoon of jam, then bake in a 375˚(F) oven until the pastry is golden and the jam is bubbling.

Before serving you can give them a dusting of confectioner's sugar, or a sprinkle of finely chopped, toasted nuts ~ (I prefer them just plain.)  


 If you try them, I hope you enjoy them. The aroma in your kitchen as they bake will be heavenly! 

Thank you for coming by today ~ I hope you're enjoying a wonderful day everyone!


Wednesday

Pea Pod Salad with Radishes, Basil and Ricotta Salata


I've mentioned before how I adore summer, when lunch is as simple to prepare as walking outdoors to the raised veggie & herb beds to gather ingredients for a quick salad.


The original recipe was posted June, 2009 in the New York Times and included sugar snap peas with mint.

No sugar snap peas in our garden, however we did grow pea pods again this year, and the basil is abundant right now so I substituted the pea pods for the sugar snap peas, and basil for the mint. Radishes are a quick crop to grow, and if you plant them successively at two week intervals you can have a constant supply throughout the growing season (if you don't grow them they are usually available inexpensively year round in the market.) Use a mandolin if you have one to slice them nice and thin ~ they seem to taste better that way. :)


The dressing is light and flavorful; a vinaigrette of garlic, freshly squeezed lemon juice, balsamic vinegar, extra virgin olive oil and salt and pepper to taste. It compliments this combination of crisp vegetables very well.

If you don't have Ricotta Salata cheese, try using Feta or a crumbly goat cheese.


Once you make this, you won't really need to refer to the recipe ~ Here's the link to a printable copy if you would like to try it. (And I hope you will if this sounds good to you.)


Please stop by "Designs by Gollum" to see all of Foodie Friday entries for this week.

Thanks for stopping by today friends!


Monday

Tomato Slabs Roasted with Pesto and Parmesan


This simple way of preparing tomatoes caught my eye during a rerun episode of The Barefoot Contessa.  It's perfect for this time of year when the tomatoes are at their best. 


And the basil is growing profusely.  When we become overrun with the stuff I make pesto. Some for enjoying now, and some for the freezer.  


For the freezer batch, I use the food processor to combine the basil leaves, olive oil and salt and pepper as usual, but I find it has a much fresher taste if I stir in the freshly grated Parmesan Cheese, ground pine nuts and fresh minced garlic cloves just when I'm ready to use the pesto (rather than freezing the garlic and pine nuts with the sauce.)  


These are SO delicious, and so easy to put together ~ just thick tomato slices, a sprinkle of salt & pepper, a gentle shower of dried oregano, a few drops of olive oil, then they are roasted for a few minutes. Next a spoonful of fragrant pesto, and a topping of cheese, then back they go into the oven until the cheese melts.


I made a few changes to The Barefoot Contessa version.


I used my own version for the pesto, and also cut way back on the salt and oil compared to Ina's version. The pesto is already seasoned, and contains olive oil, and the Parmesan is plenty salty.


These would make a fabulous appetizer, light lunch, and they are a salad or side dish ~ delicious served warm, or at room temperature.


This version is roasted in a 425˚ (F) oven for just a few minutes, but I'm sure they could be made on the outdoor grill either on a perforated grill basket, or a grill-proof baking sheet.


This one, and similar simple recipes can be found in Ina's "How Easy Is That?" cookbook.


Next time I would consider topping them with grated mozzarella cheese or Romano.  I think they would be equally delicious that way, too.


The printable recipe can be found on my recipe page by clicking here.


Thanks so much for stopping by, and for any thoughts you would like to share.


A Sampling of my food . . .

Subscribe:

 Subscribe in a reader...or

Enter your email address:

Delivered by FeedBurner