Tuesday

Apple Crostada (and the Easiest Homemade Rolled-Pastry Crust Ever)


Apple Crostada with the easiest, homemade, rolled pastry crust ever.  

Do you struggle with homemade rolled-pastry dough for sweet or savory pies, quiches, tarts, crostadas, etc. and opt instead for the store-bought stuff instead?  There IS a slightly healthier alternative which tastes infinitely better, in my opinion. 

I know, I know... store-bought pie dough requires almost no work at all... but have you ever looked at the list of ingredients on the box of the most popular refrigerated/frozen pie crust brand?

Here you go:

Wheat Starch, Partially Hydrogenated Lard with BHA and BHT Added to Protect Flavor, Bleached Flour, Water, Sugar, Rice Flour, Salt, Xanthan Gum, Potassium Sorbate and Sodium Propionate (Preservatives) Citric Acid, Colored with Yellow 5 and Red 40.


And to me the flavor leaves a lot to be desired. 

If you've ever had problems with homemade rolled pie crusts you may be interested in this butter and cream cheese pastry dough.  It just takes moments to mix up in the food processor, then after a short chill in the refrigerator you'll be well on your way to one of the most forgiving, easy to roll out, flaky and tender crusts you've ever made. Plus, the flavor is outstanding.


The dough recipe has been around for years and can be used with either sweet or savory fillings.


To make the crostada filling I used peeled and sliced Granny Smith apples, tossed with some sugar, cinnamon, a squeeze of lemon juice, and a few drops of pure vanilla extract. 


I love crostadas, they are rustic and free-form; so much easier to make than a traditional pie. To form the crostada, roll the dough out on a floured surface, place the rolled dough on a parchment or silicone baking liner on a shallow baking sheet, then pile the filling in the center of the dough, dot with butter if desired, gather the edges up around the filling, pinching and pleating the dough where necessary to hold the filling in place.  You can brush with an egg wash or heavy cream and sprinkle with sugar if you like.  Then bake until fruit is bubbling and slightly tender and crust is nicely golden.


This time I cut some of the leftover dough into shapes with a leaf-shaped cutter, and brushed with an egg wash (some I tinted slightly with food coloring to imitate autumn colors), and sprinkled with coarse sugar.  I baked them separately on their own lined baking sheet.   When the crostada was taken from the oven I brushed the exposed fruit with melted apricot jam for extra sheen, then decorated with the baked cut-outs, using the apricot jam as 'glue' to help keep the leaves in place.
 
If you've made this dough before, or if you try it, please let me know what you think of it. :)  Holiday baking is just around the corner!

If you would like a printable copy for the cream cheese pastry dough you'll find it on my recipe blog by clicking HERE.

Thank you for coming by today. xo~m. 


Monday

Lemon Cream Pots with Lemon Wafers

Lemon Cream Posts with Delicate Lemon Wafers


Another great little dessert from Donna Hay ~ the recipe reminds me of my old stand-by Lemon Pots of Cream recipe which I've shared before, but this one is easier to make.   I used Meyer lemons, but the recipe actually calls for regular lemons, so those will work just fine.


If you like the flavor of lemon but don't care for overly sweet desserts, you may really like this one.  It's creamy and decadent and I found the 3/4 serving size almost too much for me.  Next time I think I may reduce each portion to 4 ounces each... when the (slightly sweetened) softly whipped cream topping is added, it's quite enough.


The Lemon Wafers add a good contrast to the Lemon Cream Pots, and they are easy to make.  But if you don't feel like making them, just add any other little crisp cookie... I won't tell.  :)


If you would like a copy of the recipe you can find it on my recipe blog... HERE.


Thank you for stopping by today!  I'm always most appreciative of any comments you would like to leave.
Have a wonderful week, friends.


Saturday

Street Festival ~ Farewell to Summer 2010


The annual Art Along the River festival signifies the end of summer here...
it's a two day affair featuring art, music, a dog walk, food and micro-brew tastings from local breweries.
I thought you might like to take a look at some of the sights we enjoyed last weekend.


A very tall, calm, friendly fellow with beautiful markings and interesting eyes. (Yes, I'm a dog lover...)


Good Blues...


A lovely lady enjoying the music ~ :)


My favorite part of the event; the Street "Painting"
(it's actually chalk.) 


Street painting can be traced back to Europe beginning in the 16th century.

Called Madonnari in Italy (because the Madonna was a favored subject), itinerant artists traveled to towns and provinces around festival and holy days to create their artwork from chalk, charcoal, or broken tiles on streets, in town squares, or near churches. In appreciation of the artwork passersby would leave oil, a bit of bread or occasionally a coin or two.


 In England the artists are called screevers.


Of course in a short time the artwork would wash away.

World War II caused a disruption of this form of folk art, but a resurgence emerged in the 1970's. In Boston, in 1973 "Sidewalk Sam"  (Robert Guillemin)  was recognized as the first street painter in the U.S.


Over the years street painting has become popular worldwide ~ and you may have seen some of these incredible artists at work near your home.


I love that an area is designated for children to try their hand at chalk painting too.


Soft afternoon shadows on this beautiful piece.


Every year the artwork is different, and I try to pick my favorite.
It was a tough call this time, but I kept being drawn to this beautiful image of an early 1900's young woman *sigh*


Remarkable detail on this historical character.


Well, hello again.


I definitely think she was my favorite this year (as evidenced by the number of photos I took of her...) I couldn't help myself, I was drawn back again and again.


Bonus...  Accidentally captured in the top corner  *cute shoes!*


Hiding under the Sunday paper ~ for the cat lovers among us.


Look! It's Toucan Sam's cousin. :D


Colorful hummingbird and plumeria blossoms.
 
 
Passing the toy shop window on the way back to the car ...
.
.
.
 
The perfect conclusion to a magical day. :)
,
,
,
 
Thanks for stopping by for a visit today, friends!
.
.
 
Have a wonderful weekend.
xo~m.


Thursday

Mini Caramel Apples


Oh, how I wanted to love these little Mini Caramel Apples.


I found the idea from a magazine a couple of years ago; I think it was "Family Fun" magazine.


They WERE fun to make...


Just melt some candy caramels ~


And use a melon-ball scoop to cut apple balls from the apple, leaving a bit of green peel on each.


Stick a small pretzel stick in the center of the green peel and dip into the melted caramel, and allow them to "set up" on waxed paper or a silicone baking liner. You could roll them in finely chopped nuts if desired...


But don't bother. 

In fact, I suggest you don't even bother making them.


Shortly after dipping them-- the lovely caramel slid slowly off the little "apples" into a sticky, liquid pool on the plate. 
Not pretty. :0(


In anticipation that this might happen I had actually blotted the apple rounds with a paper towel to absorb some of their juice just before dipping them.  Pffft.  


Forget it.  Next time I'll just core and cut the apple in wedges and let everyone dip their own into the warm caramel.

Once again, sometimes the simple way is the best way. ;0)

I hope you don't mind that I shared this kitchen-flop with you~ but I thought you should know.


Please stop on by Designs by Gollum for "Foodie Friday" to see some kitchen-successes this week. 

Thank you for stopping by today!
xo~m


Fresh and Easy Spinach Soup

This is a soup I make with fresh, organic baby spinach.  I usually buy organic spinach in the large rectangular tubs, and for this soup it's perfectly okay if the spinach is just a little beyond its' prime as long as it still smells good and hasn't started to "turn". :0(


I don't use a recipe, just a method. Heat a bit of olive oil in a large saute pan, add a small finely chopped onion and a peeled, smashed garlic clove to the pan and allow to slowly turn golden. Rinse about 4 to 5 large handfuls of  baby spinach leaves, shake off excess moisture. Push the golden onion and garlic to one side of the pan, add a little more olive oil to the pan if necessary, turn heat up to medium-high, add the spinach,some sea salt and freshly ground pepper. Quickly saute the spinach, mixing with the onion/garlic, turning frequently with tongs until the spinach is just tender and wilted --- this only takes a minute or two.

Place the hot spinach into the bowl of a food processor fitted with a metal blade, pulse until finely minced, while machine is running add a lump or two of butter and pour in some chicken broth (homemade or canned), process until smooth. I allow machine to run continuously for a couple of minutes. Add a bit of half & half or heavy cream as desired (it mellows out the flavor so the spinach isn't so strong tasting.)  Taste and add more salt, pepper, butter or cream if desired.


I usually serve the soup right away, but you can heat it gently on the stove top if it is not hot enough.


I like to serve a little "something" alongside soup ~ this time I baked some little puff pastry cut-outs. I always save any leftover scraps from frozen puff pastry, store them in the freezer in an airtight bag. When ready to use, remove from the freezer allow to thaw just slightly.  Cut them out however you like,  then bake them off.


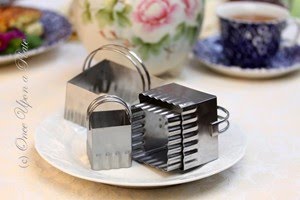
You can cut them with a knife or small cutters...


I used mini-cutters in Autumn shapes this time. Place them on a parchment paper-lined baking sheet. Dock (prick) them with a wooden pick. You can brush with egg wash and sprinkle with grated Parmesan cheese, Cayenne pepper, or herbs if you like, then bake off in a hot oven until puffed and golden.


Yummy ~ and they add a nice textural interest with most any simple soup.


I hope you enjoy!


Please go by and visit Michael on her blog "Designs by Gollum" to see what's cooking this week on Foodie Friday!

Click the button below to link to Michael's blog:


Thank you for stopping by to visit today!


A Sampling of my food . . .

Subscribe:

 Subscribe in a reader...or

Enter your email address:

Delivered by FeedBurner