Sunday

Sticky Sweet Sausage Bites

If it weren't for a dear friend of mine,
I probably would never have tried these.
But I am so pleased she showed me the way
to this recipe from Nigella Lawson.
They are delicious! Another winner from Nigella.
Cocktail Sausages
adapted from "Express".
.
Nigella's comments:.
"If you want to have something hot to pass around on a tray, then cocktail sausages are what you're after. There's nothing fiddly to make, nothing to go right or wrong, and everyone loves them. These are not just any cocktail sausages: the sesame oil, honey and soy give them a sweet-savoury stickiness that is pretty well impossible to resist."
...
Ingredients:
.
2 1/4 pounds cocktail sausages
2 tablespoons toasted sesame oil
1/2 cup honey
2 tablespoons soy sauce
.
Preheat the oven to 400 degrees F.
..
Separate the sausages if they are linked and arrange them in a large, shallow-sided roasting pan. Whisk together the oil, honey and soy sauce and pour over the sausages, then use your hands, or spatulas, to toss so that all the sausages are thoroughly covered thoroughly with the liquid ingredients..
Roast for 25 to 30 minutes; give them an even turn about in the pan halfway through cooking
.
As soon as they are cool enough to eat ~ ENJOY!
.
.Tip: DO line your pan with foil (non-stick really helps)..
...
As my friend did, I used kielbasa, cut in to bite sized chunks ~ perfection! I served mine with coconut rice and cabbage slaw on the side, to make a meal of them. The flavor combinations were delicious, I look forward to making these again.

Beer Battered Onion Rings

Do you prefer to dine out, or eat at home?
There was a time when I loved to go out a few times a week, but frankly compared to the San Francisco Bay Area, there are precious few restaurants worth the trip to town here, which is about 13 miles away.
I actually enjoy staying home, here in the (usually) peaceful countryside,
cooking something delicious.
Last night was no exception ~ and I had a craving.
No, not the blue cheese bacon burger...
I was craving ONION RINGS!
The craving doesn't happen often, maybe two times a year ~
and yesterday was one of those days.
I would have been happy just to have had onion rings for dinner, but my conscience wouldn't let me ~ hence the sirloin burger (made from the local organically raised & hormone-free beef .)
In an attempt to ease guilt with this not-so-healthy meal, I included a handful of fresh blackberries from the vines, and red cabbage to include some antioxidants. :) hahaha
Since everyone knows how to make their favorite burger, we'll skip that and head right to my favorite ~ The Onion Rings.
They couldn't be simpler to make, and this batter produces a crispy, crunching coating that shatters when you bite into it ~ a bit more substantial than tempura batter.
The other plus is that it's so easy to stir up, and is fantastic for almost anything fried ~ fish, shrimp, veggies, etc.


Here is all you'll need to make the batter ~
Equal parts cold beer and flour (I use 8 to 10 ounces of beer to 1 level cup all-purpose flour), about 1/2 teaspoon baking powder and a pinch or two of salt. After you whisk it you can determine if you need another splash of beer to thin the batter a bit. It's better to start out thick, you can always thin it out, but you cannot go wrong with this recipe. Additional beer can be stirred in at any time if the batter begins to become too thick.


Onion Rings

Tip: Something I learned from a soul food restaurant cook; use chopsticks to handle the rings. Not your GOOD chopsticks. I just use the ones my local Sushi restaurant provides when I order to go. Use one for the rings in the batter, and one for the rings in the oil.


For such a small amount of frying I just use a little portable deep fryer (Fry Daddy in this case), and I always use canola oil for the beer batter preparation.


Preheat oven to 275-degrees (F)

Place a wire rack inside a baking sheet with a shallow rim. (Quarter-sheet pan is perfect.)

I slice the onions fairly thick (about 1/2 -inch to 3/4-inch), separate into rings. I slice the onions first, then whisk up the batter (put it in the fridge to keep it cold if there is any delay in using it, but it's best used within 20 to 30 minutes.)


Heat the oil, dip a couple of rings into the batter, submerging completely, lift and drain one at a time to allow the excess batter to run off. Carefully place them one at a time into the hot oil; don't crowd. Allow them to cook for a few moments, then turn them over with the other chopstick , you can turn them over and over to assure even frying. When they appear golden, and cooked to your liking, lift from the oil by placing the chopstick through the onion ring and allowing any excess oil to drain back into the pot, then place on the rack in the pan & place in the oven to hold until all are fried.

Sprinkle with salt if you like ~ I don't add extra.

You can eat them immediately, but the trick to crispy onion rings is to allow them to stay in the 275* oven for an additional 10 to 20 minutes to further crisp the coating.
(Watch them to make sure they don't begin to over bake, since ovens vary.)


Ummm ~ are they EVER good! :)

If you make them, I hope you like them as much as I do.
But back to the original question~
Do prefer to stay in, or go out to eat?
Do you have a favorite meal? Care to share?
I'd love to hear your opinions. :)


Postcard ~ From the Garden


Saturday

Late Summer Greek-style Salad


In late summer the tomatoes are so sweet and juicy, but the cooler evening temperatures are a reminder that fall is just around the corner.


It makes me realize how much I'll miss these warm weather jewels.

Sometimes I just like to serve them simply; sliced with a drizzle of olive oil and red wine vinegar, with a twist of salt and freshly ground pepper.

Sweet home-grown tomatoes and home-grown cukes from my kind neighbors ~ a few cubes of Feta cheese, quartered Kalamata olives, and a shower of crushed pink pepper corns makes me extra happy. :)


The first bite reminds me, one more time of why I love summer!

August Garden Party

(Click on any photo to see enlarged view.)

Earlier this month a group of us gardening enthusiasts, internet pals from across the US and Canada, gathered to have virtual/real Garden Parties simultaneously. Despite the poor weather in the east (on both sides of the border) it was great fun to see the beautiful creativity each member had to offer. The food, gardens, and themes were imaginatively festive and diverse, even the ones that were forced indoors because of the weather. Good sports!


Unfortunately, by August my blooming gardens are starting to wane. Only a few roses, day lilies, clematis, and shrubs in the hummingbird and butterfly gardens are still blooming, so...

I decided to set up the buffet table for my small party(four of us) on the cool grass in a grove of Douglas Firs, with the mature rhododendrons and azaleas providing a verdant green backdrop. The trees offered welcome shade during the late afternoon gathering.


A seafood buffet seemed appealing, so I planned the menu around that theme ~


(Click to enlarge)
I'll be posting some of the recipes in the upcoming days in case anyone would like them.
I recommend the White Gazpacho, which is available here in the archives.


~ a fairy sighting in the tabletop topiary!


I failed to catch a photo of dessert ~ but here's another sweet ending.
After all of that rich food breakfast the next morning:
Everyone seemed to have enjoyed themselves ~ I wish you could have been here, too!

Postcard ~ From the Garden


A Simple Foccacia ~ Caramelized Onions, Shallots, Sundried Tomatoes and Fresh Rosemary


Unlike most foccacia recipes this one requires no sponge (starter), making it a good candidate on a busy day when you want freshly made foccacia. The flavor and texture are very good considering how little effort is required. The dough can be made with a stand mixer or bread machine, and shaped into two foccacias or (soft) breadsticks.

The recipe is directly from the back-of-the-bag courtesy of the Gold Medal Flour folks.
I attempted to find a link on their site to link to it here, but I couldn't find this particular recipe, so this is next best:


(Click to enlarge)


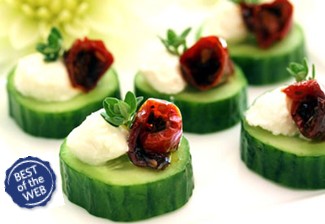
I topped it with caramelized onions, shallots, a sprinkle of chopped sundried tomatoes and fresh rosemary, along with a couple of grinds of fresh pepper.


Slices make a wonderful accompaniment to salads (as with this short-cut Caesar), soups, stews, or as an appetizer with beverages. I would make this foccacia recipe again.

Friday

Orecchiette with Broccoli, Sausage, & Roasted Peppers

There are two pasta recipes I go back to again and again, and this is one of them. I'll share the other favorite within the next few days. Both of the recipes call for Orecchiette (or "Little Ears" shape) pasta. Although you can use other small pasta, the quality of the pasta you choose will determine the outcome.


Here is my favorite brand of orecchiette.

Click to enlarge to see the beautiful texture and shape. Oooh, it's so good!


It's available at a couple of stores in the San Francisco Bay area, or can be ordered via the internet at Italian Harvest, the San Francisco company (husband & wife team) who import it:


It may be available elsewhere in North America, but I haven't found any other sources. Italian Harvest sells all kinds of Italian products as well as the artisanal pastas, you may want to look around their site for other goodies. I've always been satisfied with their prompt delivery and customer service.


If you cannot find this particular brand, I urge you to seek out another high quality imported Italian orecchiette, it costs a little more but makes a huge difference in your dining experience.


Orecchiette with Broccoli, Sausage, and Roasted Peppers
Serves 4 to 6


Although the recipe calls for roasted peppers, I most often swap them out for fresh, diced tomatoes if they are in season, I like the fresh flavor better. I use the jarred roasted peppers in the winter when fresh tomatoes often aren't so good. Another good substitute in winter are sundried tomatoes, cut into strips.


Ingredients:
4 ounces sweet or hot Italian sausage, casings removed (My country meat store sells their wonderful house-made Italian sausage in 8 ounce package, I use the entire 8 ounces in this recipe.) I'm sure you could substitute Turkey Italian sausage if you prefer.
1 cup jarred roasted red peppers, rinsed and chopped medium (As noted, I prefer the fresh diced tomatoes when in season, or sun-dried tomatoes)
6 garlic cloves, minced
1 bunch broccoli (1 1/2 pounds), florets cut into 1 -inch pieces and stalks peeled and sliced 1/4 inch thick. (For this recipe I just buy broccoli crowns, so there is less stalk to deal with.)
Salt to taste
A pinch of Red pepper flakes if you like it spicy
1/2 cup water
1 pound of dried orecchiette (I usually use about 8 to 10 ounces)
1 Tablespoon extra-virgin olive oil

Grated Parmesan or Pecorino cheese

Directions:

Bring 4 quarts water to a boil in a large pot for the orecchiette.
Meanwhile, cook the sausage in a large skillet over medium-high heat, breaking it into small pieces with a spatual or spoon, until browned. Stir in the roasted red peppers (if using) and garlic and cook until fragrant, about 15 seconds.
Stir in the broccoli, 1/2 tsp. salt, and water. Increase the heat to high, cover the skillet and cook until the broccoli begins to turn bright green, about 2 minutes.
Uncover and continue to cook, stirring frequently until the liquid has evaporated and the broccoli is tender, about 5 minutes longer.

When the water is boiling, stir in 1 tablespoon salt and the orecchiette. Cook, stirring often, until the orecchiette is almost tender but still a little firm to the bite.
Reserve 1/2 cup of pasta cooking water, then drain the orecchiette and return it to the pot.
Stir in the sausage and broccoli mixture, the fresh, diced tomatoes, oil, and toss to coat.
Add the reserved pasta cooking water as needed to loosen mixture before serving.

I pass the grated Parmesan or Pecorino Romano at the table so each diner can add their own.

Inspired by: "America's Test Kitchen Family Cookbook"

Thursday

Postcard ~ From the Garden

Looking North at the end of the driveway Sunset.
The smoke from the Northern California fires obliterates the view of all but the first set of mountain ridges in the distance.
(Click photo to enlarge.)
It's been such a rough year for fires in both California and Oregon,
and we share the residual smoke.

Chicken and Potato Cakes with White Nectarine Yogurt Drizzle


This is my take on Lee Bailey’s Chicken Pancakes. I like to serve these over tender salad greens; the simple dressing I stir up is drizzled on both the Chicken Cakes and the greens, making a delightful warm/cold salad. The bonus is my dressing is lower in calories, but not in flavor. (However the Chicken-Potato Cakes aren’t exactly low-calorie, but they ARE very good!)
The original recipe included directions for Papaya Salsa; you can also serve these with sour cream or creme fraiche.

Chicken Potato Cakes with White Nectarine -Yogurt Drizzle
I usually halve this recipe, but I’ll give proportions for the full recipe here.
Sometimes I make the cakes a little larger than suggested (as you can see by the photos here.)

6 medium-size chicken thighs
1 ½ cups shredded potatoes, squeezed dry by twisting in a clean tea towel, removing as much liquid as possible.
1 small onion, grated
2 tablespoons flour
Tabasco Sauce, to taste
Vegetable oil and butter for frying
3 medium eggs, lightly beaten
Nectarine (or Peach) Yogurt Drizzle ~directions follow

Preheat oven to 375-degrees (F)

Generously salt and pepper the chicken thighs and place them in a pan, snugly with the skin side up. Stretch the skin all over the tops of the thighs to prevent them from drying out while baking. Place in the oven and bake for 30 minutes without opening the oven door and then turn off the oven. Leave chicken in the closed oven, undisturbed for another 45 to 60 minutes to continue baking by the retained heat. This part may be done in advance.
When ready to assemble the cakes, remove kin and bones from the chicken and discard. Chop meat coarsely and set aside.

In a large bowl mix the potato with onion, flour 3/4 teaspoon of the salt, a couple of good grinds of pepper and a drop or so of Tabasco. Combine all thoroughly.
In a large skillet, over medium-high heat, heat up a combination of oil and butter. While this is heating combine chicken with the potato mixture and then add the eggs. Mix quickly.
When the oil is hot, drop rounded tablespoonfuls of the chicken mixture into the skillet. Allow to cook until golden, about a minute or so or a little longer before turning. Turn and flatten slightly and cook second side until golden. Keep finished cakes warm until all the chicken mixture is used. Adding oil and butter to the pan as needed.
The Drizzle:
Here’s how I serve them~ it’s fast and flavorful;
To each 6 to 8-ounces of plain (unflavored) yogurt mix in a couple of tablespoons of nectarine or peach jam. If you like your drizzle with a bit more tart flavor stir in a squeeze of lemon, orange or lime juice.
Hint: Stir the jam to break it up a bit before adding to the yogurt to make blending easier.
I use Stonewall Kitchen’s White Nectarine Jam, but any regular Peach Jam or Nectarine Jam would be suitable.

Sweet Crescents ~ Won Ton Wrappers

Whenever I have a few wonton wrappers left over I usually make them into these crispy, sweet and crunchy morsels. The recipe is from Rhoda Yee, a brilliant San Francisco Bay Area teacher and cookbook author. I learned so much from her when I first starting cooking Chinese food back in the late 70's & early 80's, I've used her cookbooks so much, they are tattered and practically falling apart.

I've never made the entire 8 to 10 dozen! If you want fewer, just guestimate and reduce the proportion of filling ingredients accordingly, just keep all filling ingredients in equal proportions, keeping in mind it only takes 1 level teaspoon of filling for each crescent. Hot tea, ice cream or some fresh chilled fruit are good with these. Let them cool somewhat before sampling ~ the filling will be molten right out of the pan/wok.

Sweet Crescents
Yield 8 to 10 dozen

1/2 cup chopped, salted cocktail peanuts
1/2 cup coconut flakes
1/2 cup brown sugar
1/2 cup granulated sugar
1 package won ton wrappers
1 egg, beaten

Mix peanuts, coconut, brown sugar and granulated sugar. Fold won ton squares into triangles. Round off the top corner with scissors . (Or buy the round wrappers.) Place 1 teaspoon filling in center. Moisten edges with beaten egg and seal.

Deep fry in hot oil until golden, turning once; drain.

Store in air-tight container. They will keep for 3 to 4 weeks if kept in an airtight container.
Ha! They NEVER last that long around here.

Postcard ~ From the Garden

~ Morning in the Fern Garden ~

Salsa Fresca ~ Fresh Salsa

Depending upon the area in Mexico, this is called Salsa Fresca or Salsa Cruda, it is a fresh, uncooked salsa.

You'll find it very versatile; served as a dip for tortilla chips, as a table salsa with many kinds of foods; Mexican dishes ~ or any simply prepared chicken, fish, beef or pork, as well as on scrambled eggs. I particularly like it as a condiment with grilled or roasted foods, as well as with beans or rice. I always stir some into my homemade guacamole.

I've been making this for almost 30 years ~ I've never found a fresh salsa I like better. For parties I have made quarts of this, and there is seldom any left. I love this stuff!!

It's a common recipe, but since I learned it from Mexican food authority and cookbook author Diana Kennedy, that's how I refer to it ~ Diana Kennedy's Salsa Cruda.

The Sinaloa version includes scallions and lime juice instead of the onions and water, the Yucatean version calls for Seville orange juice in lieu of the water ~ but this one is my favorite.


Here are the ingredients you'll need to make one of the most flavorful salsas around.
Far superior than anything you can buy; fresh or jarred, in my opinion.


Salsa Mexicana Cruda ~ Fresh Mexican Sauce

Although this can be made up to three hours ahead, it is best made at the last moment for optimum flavor and texture.

Through the years I've tweaked Diana's recipe just a little; my notes are in italics.

Ingredients:
1 tomato (about 6 ounces), leave skin on
1/2 medium onion
6 sprigs fresh coriander (more if you love it!)
1 to 3 fresh chiles, preferable serranos (my favorite) but I've used fresh jalapeno, too.
Diana's recipe calls for 3 chilis, but since each chili can vary so much in heat intensity I always start with less. You can always add more to amp up the heat if you like it hotter after it's made.
1/2 teaspoon salt, or to taste
1/3 cup cold water
(I prefer a less watery salsa, so I hold back on this until I determine how juicy the tomatoes are. Often I only add a tablespoon of water, or less.)

Assembly:

Finely chop all of the ingredients.
(Diana advises not to remove the seeds or pith from the chili -but I do if the chilis are really hot, just to tame them a bit.)
Mix together in a bowl, stir in the salt and add more if needed.
Add water. If the tomatoes are really juicy, you may not need much water at all.

Chimichangas ~ Oven Baked Chicken

A friend shared a very good baked chimichangas recipe, using ground beef;
I adapted it using chicken breasts.

Chicken breast cut into narrow strips, red onion, red bell pepper, a couple of cloves of garlic, salt and pepper and some oregano if you like.

I grilled the ingredients as you would for fajitas, on a hot, flat grill.


The mixture is only going to be warmed in the oven, make sure the chicken is cooked through.

Finished grilling, and ready to fill the flour tortillas.

Baked off in a hot oven until crispy.

Here's my recipe ~

Oven Baked Chicken Chimichangas

I like mine with a lot of veggies, but you can adjust this to more chicken and fewer veggies. One very large chicken breast half will yield about 3 Chimis the way I make them.

Large flour tortillas

Boneless, skinless chicken breast(s)

Thinly sliced onions; yellow, white or red

Bell pepper, (any color you like) sliced into narrow strips

Seasonings: Garlic, oregano, salt and freshly ground pepper, all to taste

Squeeze of lemon or lime juice (optional)

a bit of salsa, homemade or from the jar

canola oil for the grill and baking pan

Directions:

Preheat oven to 450-degrees (F)

Brush oil on the inside (bottom only) of a shallow rimmed baking pan and set aside

Heat a small amount of oil on a hot grill, or in a large heavy frying pan (cast iron is ideal), add the chicken, bell pepper, onion, and garlic to the hot grill. Allow to sear, turning the ingredients so they cook evenly, but do not burn. Remove to a plate or bowl and stir in a spoonful or two of salsa.

Warm the flour tortillas so they are pliable. Place the chicken filling mixture down the center of the tortilla and fold as for a burrito (envelope style). Place seam side down on oiled baking pan.

Repeat, with remaining tortillas and filling ingredients, arranging each Chimi on the pan so there is space between each one. At this point you may brush the assembled Chimis with a little canola oil, or bake as is.

Bake until golden, or as crispy as you like. It usually takes about 15 minutes or so in my oven.

Serve with sour cream, grated cheese, salsa, sliced black olives, or guacamole if desired.

I usually serve them with my favorite fresh salsa (Salsa Fresca/Salsa Cruda); recipe listed separately.


A Sampling of my food . . .

Subscribe:

 Subscribe in a reader...or

Enter your email address:

Delivered by FeedBurner